How we built TwitterMatic.net - Part 2: Creating an Azure project
Edit on GitHub “Knight Maarten The Brave Coffeedrinker was about to start working on his TwitterMatic application, named after the great god of social networking, Twitter. Before he could start working, he first needed the right tools. He downloaded the Windows Azure SDK, a set of tools recommended by the smith (or was it the carpenter?) of the digital village. Our knight’s work shack was soon ready to start working. The table on which the application would be crafted, was still empty. Time for action, the knight thought. And he started working.”
This post is part of a series on how we built TwitterMatic.net. Other parts:
- Part 1: Introduction
- Part 2: Creating an Azure project
- Part 3: Store data in the cloud
- Part 4: Authentication and membership
- Part 5: The front end
- Part 6: The back-end
- Part 7: Deploying to the cloud
Creating an Azure project
Here we go. After installing the Windows Azure SDK, start a new project: File > New > Project... Next, add a “Web And Worker Cloud Service”, located under Visual C# (or VB...) > Cloud Service > Web And Worker Cloud Service.
The project now contains three projects:

The web role project should be able to run ASP.NET, but not yet ASP.NET MVC. Add /Views, /Controllers, Global.asax.cs, references to System.Web.Mvc, System.Web.Routing, … to make the web role an ASP.NET MVC project. This should work out fine, except for the tooling in Visual Studio. To enable ASP.NET MVC tooling, open the TwitterMatic_WebRole.csproj file using Notepad and add the following: (copy-paste: {603c0e0b-db56-11dc-be95-000d561079b0})

Visual Studio will prompt to reload the project, allow this by clicking the "Reload" button.
(Note: we could have also created a web role from an ASP.NET MVC project, check my previous series on Azure to see how to do this.)
Sightseeing
True, I ran over the previous stuff a bit fast, as it is just plumbing ASP.NET MVC in a Windows Azure Web Role. I have written about this in more detail before, check my previous series on Azure. There are some other things I would like to show you though.
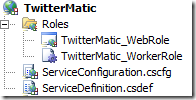
The startup project in a Windows Azure solution contains some strange stuff:

This project contains 3 types of things: the roles in the application, a configuration file and a file describing the required configuration entries. The “Roles” folder contains a reference to the projects that perform the web role on one side, the worker role on the other side. ServiceConfiguration.cscfg contains all configuration entries for the web and worker roles, such as the number of instances (yes, you can add more servers simply by putting a higher integer in there!) and other application settings such as storage account info.
ServiceDefinition.csdef is basically a copy of the other config file, but without the values. If you are wondering why: if someone screws with ServiceConfiguration.cscfg when deploying the application to Windows Azure, the deployment interface will know that there are settings missing or wrong. Perfect if someone else will be doing deployment to production!
Conclusion
We now have a full Windows Azure solution, with ASP.NET MVC enabled! Time to grab a prefabricated CSS theme, add a logo, … Drop-in ASP.NET MVC themes can always be found at http://www.asp.net/mvc/gallery. The theme we used should be there as well (thanks for that, theme author!).
In the next part of this series, we’ll have a look at where and how we can store our data.
This is an imported post. It was imported from my old blog using an automated tool and may contain formatting errors and/or broken images.


0 responses