 Earlier this week a colleague of mine asked me if there was such thing as a DataGrid or GridView or something like that in the ASP.NET MVC framework. My first answer was: “Nope!”. I advised him to look for a nice foreach implementation or using ExtJS, Dojo or similar. Which made me think… Why not create a simple GridView extension method which generates a nice looking, plain-HTML grid with all required features like paging, editing, deleting, alternating rows, …?
The idea was simple: an extension method to the HtmlHelper class would be enough. Required parameters: a header and footer template, item template, edit item template, … But how to pass in these templates using a simple C# parameter… Luckily, C# 3.0 introduced lambdas! Why? They are super-flexible and versatile! For instance, take the following code:
// C# code:

 public void RenderPerson(Person p, Action<T> renderMethod) {
     renderMethod(p);
 }
// ASP.NET code:
 <% RenderPerson(new Person(), person => { %>
     Hello! You are <%=person.Name%>.
 <% } %>
It translates nicely into:
Response.Write("Hello! You are Maarten.");
Creating a GridView extension method should not be that hard! And it sure isn’t.
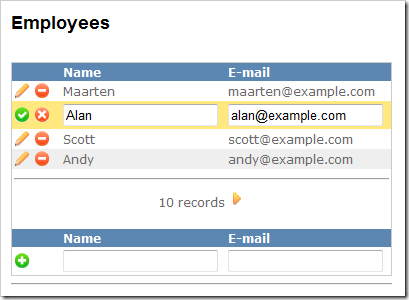
Live demo
Perhaps I should put this last in my blog posts, but there are always people who are only reading the title and downloading an example:
- MvcGridView.zip (478.35 kb) (full example)
- MvcGridView-1.0.zip (25.98 kb) (ASP.NET MVC 1.0 version)
1. The GridView extension method
Quite short and quite easy:
public static class GridViewExtensions
 {
     public static void GridView<T>(
         this HtmlHelper html,
         GridViewData<T> data,
         Action<GridViewData<T>> headerTemplate,
         Action<T, string> itemTemplate,
         string cssClass,
         string cssAlternatingClass,
         Action<T> editItemTemplate,
         Action<GridViewData<T>> footerTemplate)
     {
         headerTemplate(data);
        int i = 0;
         foreach (var item in data.PagedList)
         {
             if (!item.Equals(data.EditItem))
             {
                 itemTemplate(item, (i % 2 == 0 ? cssClass : cssAlternatingClass));
             }
             else
             {
                 editItemTemplate(item);
             }
            i++;
         }
        footerTemplate(data);
     }
 }
2. GridViewData
Of couse, data will have to be displayed. And we’ll need a property which sets the current item being edited. Here’s my Model I’ll be passing to the View:
public class GridViewData<T>
 {
     public PagedList<T> PagedList { get; set; }
    public T EditItem { get; set; }
 }
By the way, the PagedList
3. The View
Of course, no rendered HTML without some sort of View. Here’s a simplified version in which I pass the GridView
<%Html.GridView<Employee>(
this.ViewData.Model,
data => { %>
<table class="grid" cellpadding="0" cellspacing="0">
<% },
(item, css) => { %>
<tr class="<%=css%>">
<td><%=Html.ActionImage<HomeController>(c => c.Edit(item.Id), "~/Content/edit.gif", "Edit", null)%></td>
<td><%=Html.ActionImage<HomeController>(c => c.Delete(item.Id), "~/Content/delete.gif", "Delete", null)%></td>
<td> </td>
<td><%=item.Name%></td>
<td><%=item.Email%></td>
</tr>
<% },
"item",
"item-alternating",
item => { %>
<%using (Html.Form<HomeController>(c => c.Save(item.Id), FormMethod.Post, new { id = "editForm" })) {>
<tr class="item-edit">
<td><%=Html.SubmitImage("save", "~/Content/ok.gif", new { alt = "Update" })%></td>
<td><%=Html.ActionImage<HomeController>(c => c.Index(), "~/Content/cancel.gif", "Cancel", null)%></td>
<td> </td>
<td><%=Html.TextBox("Name", item.Name)%></td>
<td><%=Html.TextBox("Email", item.Email)%></td>
</tr>
<% } %>
<% },
data => { %>
</table>
<% });%>
4. The Controller
The Controller is perhaps the hardest part: it contains all methods that handle actions which are requested by the View. I have a Show action which simply shows the View with current data. Also, I have implemented an Edit and Save action. Make sure to check my example code download for the full example (earlier in this post).
// ...
public ActionResult Show(int? page)
 {
     CurrentPage = page.HasValue ? page.Value : CurrentPage;
     GridViewData<Employee> viewData = new GridViewData<Employee>
     {
         PagedList = Employees.ToPagedList<Employee>(CurrentPage, 4)
     };
    return View("Index", viewData);
 }
public ActionResult Edit(int id)
 {
     GridViewData<Employee> viewData = new GridViewData<Employee>
     {
         PagedList = Employees.ToPagedList<Employee>(CurrentPage, 4),
         EditItem = Employees.Where( e => e.Id == id).FirstOrDefault()
     };
    return View("Index", viewData);
 }
public ActionResult Save(int id)
 {
     BindingHelperExtensions.UpdateFrom(
         Employees.Where(e => e.Id == id).FirstOrDefault(),
         Request.Form
     );
     return RedirectToAction("Show");
 }
// ...
Note: based on ASP.NET MVC preview 3