
You can use passkeys as a second factor after password login in ASP.NET Core Identity on .NET 10. Register a two-factor token provider for users who have a passkey, then add two endpoints: one creates passkey request options for the user who passed the password check, and the other verifies the passkey before completing sign-in. Store the user id from the password step in a short-lived cookie, and compare it with the passkey’s user before signing in.
This comes from my talk “Going Passwordless: A Practical Guide to Passkeys in ASP.NET Core”, where one slide shows how ASP.NET Core Identity keeps track of a passkey ceremony between two HTTP requests. It’s a small detail, and it usually gets a nod from the audience before we move on. After one of the sessions, someone asked me a follow-up question: “Can I use passkeys as the second factor after a password, instead of an authenticator app?”
That detail from the slide is part of what makes it work. Before we implement passkey-based 2FA, let’s make sure everyone’s on the same page.
Passkeys in ASP.NET Core 10
Passkey support was added to ASP.NET Core Identity in .NET 10. SignInManager<TUser> gained a handful of methods to create passkeys, request them, and sign in with them, and the Blazor Web App template ships with a working passkey UI out of the box.
If you’re new to passkeys, I wrote a series about them on the Duende blog that covers the background and the .NET 10 implementation in more depth:
- An Introduction to Passkeys: The Future of Authentication
- Passkeys in .NET 10 Blazor Apps with ASP.NET Identity
- Deep-Dive Into Relying Party ID and Origin With Passkeys
- Adding .NET 10 Passkey Support to Duende IdentityServer and ASP.NET Core
A passkey is a public/private key pair. The server sends a challenge, the authenticator on your device (Windows Hello, Touch ID, a YubiKey, your password manager, …) signs it, and the server verifies the signature with the public key it stored earlier. Here’s what the authentication ceremony looks like:
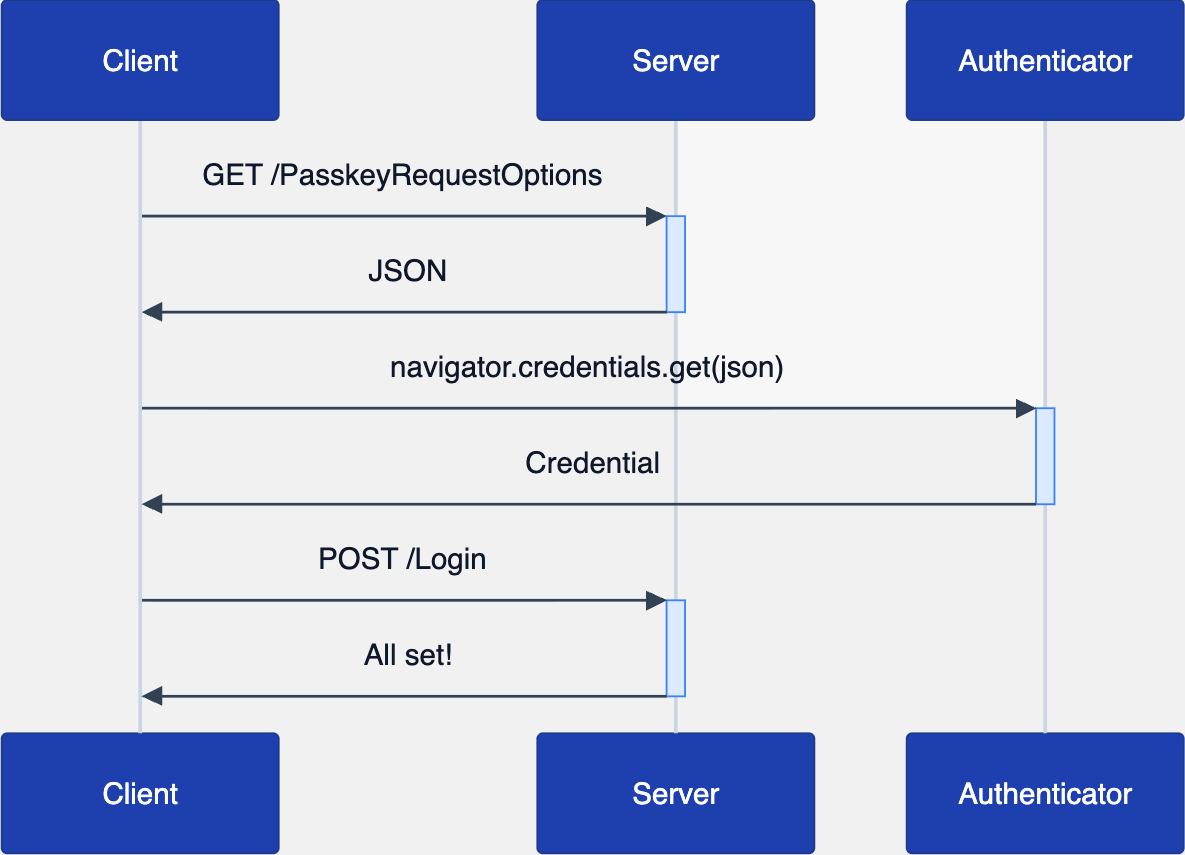
There are two round trips to the server. The first one returns the request options (including the challenge), the second one posts the signed credential back. The server has to remember the challenge it handed out in between, otherwise it can’t verify that the signature belongs to this login attempt. ASP.NET Core keeps it in an authentication scheme, so there’s no need to store it in a database on the server.
Passkeys as a first factor, or a second factor?
Passkeys, at least in ASP.NET Core, are usually pitched as a password replacement. SignInManager.PasskeySignInAsync() signs the user in directly, and it deliberately bypasses two-factor authentication. That makes sense: a passkey already combines something you have (the device holding the private key) with something you know or are (the PIN or biometric that unlocks it), and ASP.NET Core Identity requires that user verification by default. With it, a passkey covers multiple factors on its own, without a separate password.
Still, there are good reasons to use passkeys as a second factor. You may have an existing user base with passwords that you can’t take away overnight, or a compliance checklist that says “password plus second factor”. Swapping the authenticator app or SMS code for a passkey is a big improvement in both security (it’s phishing-resistant) and user experience (no more typing six digits in 30 seconds, or waiting for an SMS message that always seems to take minutes before it arrives).
Let’s build that! But first, we need to talk about authentication schemes.
Authentication schemes in ASP.NET Core
An authentication scheme in ASP.NET Core is a name, combined with a handler and its options. The handler does the actual work. The cookie handler reads and writes an encrypted cookie, while the OpenID Connect handler redirects to an identity provider and processes the response. You register schemes with AddAuthentication(), and you can register the same handler type more than once under different names:
builder.Services.AddAuthentication(defaultScheme: "Cookies")
    .AddCookie("Cookies")
    .AddCookie("ShortLivedState", o => o.ExpireTimeSpan = TimeSpan.FromMinutes(5))
    .AddJwtBearer("Bearer");
Handlers support a handful of actions. Authenticate builds a ClaimsPrincipal from the request (a cookie, a token, …), challenge kicks off a login when an anonymous user needs to be authenticated (redirect to a login page or identity provider, or return a 401), and forbid handles an authenticated user who isn’t allowed in (redirect to an access denied page, or return a 403). Handlers that can persist an identity, like the cookie handler, also support sign-in and sign-out.
Schemes also work together. You can set a different default scheme per action, which is how the classic “cookies plus OpenID Connect” setup works: DefaultChallengeScheme points to OpenID Connect so anonymous users get redirected to the identity provider, and when they come back, the OpenID Connect handler signs them into its SignInScheme (the cookie scheme), which then authenticates every request after that.
A scheme can also forward some or all of its actions to another scheme with the ForwardDefault, ForwardAuthenticate, ForwardChallenge, … options, and a policy scheme takes that one step further by picking the target scheme per request (for example, “JWT bearer when there’s an Authorization header, cookies otherwise”).
On every request, the authentication middleware authenticates with the default authenticate scheme (DefaultAuthenticateScheme, falling back to DefaultScheme) to populate HttpContext.User. Remote handlers like OpenID Connect also watch for their own callback path. Other schemes don’t run until you ask for them by name, either by naming it in an authorization policy, or by calling it through HttpContext:
// Write a principal (and some properties) to the scheme, e.g. set a cookie
await HttpContext.SignInAsync("ShortLivedState", principal, properties);

// Read it back on a later request
var result = await HttpContext.AuthenticateAsync("ShortLivedState");

// Remove it
await HttpContext.SignOutAsync("ShortLivedState");
Calling a scheme by name is what makes non-default schemes useful for more than logging users in. A cookie scheme that isn’t the default doesn’t make anyone “logged in”, but it does give you encrypted state with an expiration date that survives between requests. The cookie is protected with Data Protection, and everything you put in AuthenticationProperties.Items travels along in it.
ASP.NET Core Identity registers four cookie schemes when you call AddIdentity(). You can find them as constants on IdentityConstants:
Identity.Applicationis the “real” authentication cookie for a fully signed-in user.Identity.Externalholds the result of an external login (Google, Microsoft, …) until it’s linked to a local account.Identity.TwoFactorUserIdremembers who passed the first factor while they’re completing the second one. It expires after 5 minutes.Identity.TwoFactorRememberMepowers the “remember this browser” checkbox for 2FA.
ASP.NET Core Identity uses Identity.TwoFactorUserId for that kind of state in the two-factor flow. When you log in with a password and 2FA is enabled, SignInOrTwoFactorAsync() signs you into Identity.TwoFactorUserId with a principal that holds your user id, and the next request (where you enter your code) reads it back with GetTwoFactorAuthenticationUserAsync().
Where does the passkey challenge go?
Back to the passkey ceremony. The server has to remember the challenge between the two requests, so it can validate the signed credential when it comes back. When you call MakePasskeyRequestOptionsAsync() or MakePasskeyCreationOptionsAsync(), the passkey handler returns the options JSON and a blob of state (the challenge, and the user id if you passed a user). SignInManager stores that state in… the Identity.TwoFactorUserId scheme:
private async Task StorePasskeyAuthenticationInfoAsync(string operation, string? state)
{
    var props = new AuthenticationProperties();
    props.Items[PasskeyOperationKey] = operation;
    props.Items[PasskeyStateKey] = state;
    var claimsIdentity = new ClaimsIdentity(IdentityConstants.TwoFactorUserIdScheme);
    var claimsPrincipal = new ClaimsPrincipal(claimsIdentity);
    await Context.SignInAsync(IdentityConstants.TwoFactorUserIdScheme, claimsPrincipal, props);
}
When the credential comes back, PerformPasskeyAssertionAsync() reads the state from that same scheme and clears the temporary cookie.
At first sight, that looks like a problem for two-factor authentication. The user logged in with their password, so Identity.TwoFactorUserId holds their user id. Calling MakePasskeyRequestOptionsAsync() overwrites that cookie with an empty identity and the passkey state, so the “who passed the first factor” information is gone. After a password login, GetTwoFactorAuthenticationUserAsync() returns the user, but once you’ve requested passkey options, it returns null.
Look closer, though. When you pass a user to MakePasskeyRequestOptionsAsync(user), the PasskeyHandler puts that user’s id into the assertion state, next to the challenge. That state now lives in the same encrypted Identity.TwoFactorUserId cookie, with the same 5 minute lifetime. When the credential comes back, the handler loads the user from the state, checks that the passkey belongs to that user (and that the user handle in the response matches), and returns the user in the assertion result.
So the cookie still knows who’s logging in, it just stores that in a different shape. What it no longer knows is why the ceremony was bound to that user. Any endpoint that calls MakePasskeyRequestOptionsAsync(user) produces the same state, including a “type your username, then use your passkey” login that never checks a password. To prove the password step happened, we’ll keep one extra piece of state: a small cookie that records which user passed it.
Implementing 2FA with passkeys
The examples assume an existing ASP.NET Core Identity application on .NET 10, where users can already log in with a password and register passkeys (the Blazor Web App template with individual accounts gives you both). If you’re adding passkeys to an existing Entity Framework Core database, switching to IdentitySchemaVersions.Version3 also needs a migration to add the passkey table.
With that in mind, we need three things:
- Tell ASP.NET Core Identity that a user with a passkey has a valid second factor, so password login returns
RequiresTwoFactor. - A short-lived cookie scheme that remembers who passed the password step.
- Two endpoints for the ceremony: one that creates request options for the two-factor user, and one that verifies the credential and completes the sign-in. The one thing to avoid here is
PasskeySignInAsync(), as we’ll see.
A two-factor token provider for passkeys
SignInManager.IsTwoFactorEnabledAsync() checks more than the TwoFactorEnabled flag on the user. It also requires at least one valid two-factor provider, which is an IUserTwoFactorTokenProvider<TUser> whose CanGenerateTwoFactorTokenAsync() returns true. If your users only have a password and a passkey (no authenticator app, no confirmed phone number), ASP.NET Core Identity will happily skip 2FA altogether.
A small token provider fixes that:
// Tells ASP.NET Core Identity that a user with passkeys has a usable second factor.
// There is no token to generate or validate: the WebAuthn ceremony does that work.
public class PasskeyTwoFactorTokenProvider<TUser> : IUserTwoFactorTokenProvider<TUser>
    where TUser : class
{
    public const string ProviderName = "Passkey";

    public async Task<bool> CanGenerateTwoFactorTokenAsync(UserManager<TUser> manager, TUser user)
        => (await manager.GetPasskeysAsync(user)).Count > 0;

    public Task<string> GenerateAsync(string purpose, UserManager<TUser> manager, TUser user)
        => Task.FromResult(string.Empty);

    public Task<bool> ValidateAsync(string purpose, string token, UserManager<TUser> manager, TUser user)
        => Task.FromResult(false);
}
ValidateAsync() always returns false, so nobody can sneak through TwoFactorSignInAsync("Passkey", ...) with a made-up token. The only way to complete this second factor is the passkey ceremony.
Register it next to the default token providers:
builder.Services
    .AddIdentity<IdentityUser, IdentityRole>(options =>
    {
        options.Stores.SchemaVersion = IdentitySchemaVersions.Version3; // passkey storage
    })
    .AddEntityFrameworkStores<AppDbContext>()
    .AddDefaultTokenProviders()
    .AddTokenProvider<PasskeyTwoFactorTokenProvider<IdentityUser>>(PasskeyTwoFactorTokenProvider<IdentityUser>.ProviderName);
Note: The default ASP.NET Core Identity UI assumes the second factor is an authenticator app code. Its LoginWith2fa page only asks for a code, so a user whose only second factor is a passkey can’t get past it. Point your login flow to a page that runs the passkey ceremony instead, or check GetValidTwoFactorProvidersAsync() (which now includes "Passkey" for users with a passkey) to decide which option to show. The default “Disable 2FA” page also clears TwoFactorEnabled, which turns off the passkey second factor as well.
The endpoints
After a password login returns RequiresTwoFactor, the client needs two endpoints. I’m using minimal APIs here, but similar code works in Razor Pages or MVC.
First, register the cookie scheme that remembers who passed the password step. Like Identity.TwoFactorUserId, it only needs to live for a few minutes:
const string PasskeyTwoFactorScheme = "Identity.PasskeyTwoFactor";

builder.Services.AddAuthentication()
    .AddCookie(PasskeyTwoFactorScheme, o =>
    {
        o.Cookie.Name = PasskeyTwoFactorScheme;
        o.ExpireTimeSpan = TimeSpan.FromMinutes(5);
        o.SlidingExpiration = false;
    });
These endpoints change state and rely on cookies, so they need protection against cross-site request forgery (CSRF). Minimal APIs only validate antiforgery tokens automatically for form posts, not for JSON bodies. A route group with a filter that validates the token on every POST covers all account endpoints at once (the antiforgery services are registered by AddRazorPages(), which we’ll use for the login page):
builder.Services.AddRazorPages();

// ...

app.MapRazorPages();

var account = app.MapGroup("/account")
    .AddEndpointFilter(async (context, next) =>
    {
        var antiforgery = context.HttpContext.RequestServices.GetRequiredService<IAntiforgery>();
        if (HttpMethods.IsPost(context.HttpContext.Request.Method) &&
            !await antiforgery.IsRequestValidAsync(context.HttpContext))
        {
            return Results.BadRequest("Invalid antiforgery token");
        }

        return await next(context);
    });
With that in place, here are the login and two-factor endpoints:
account.MapPost("/login", async (Credentials c, SignInManager<IdentityUser> signIn) =>
{
    var result = await signIn.PasswordSignInAsync(c.Email, c.Password, isPersistent: false, lockoutOnFailure: true);
    return Results.Ok(new { result.Succeeded, result.RequiresTwoFactor, result.IsLockedOut });
});

account.MapPost("/2fa/passkey/options", async (HttpContext http,
    SignInManager<IdentityUser> signIn, UserManager<IdentityUser> users) =>
{
    // The user who passed the first factor. Required, so only someone who
    // just entered a valid password can start this ceremony.
    var user = await signIn.GetTwoFactorAuthenticationUserAsync();
    if (user is null) return Results.Unauthorized();

    // Remember who passed the password step...
    var marker = new ClaimsIdentity(
        [new Claim(ClaimTypes.NameIdentifier, await users.GetUserIdAsync(user))],
        PasskeyTwoFactorScheme);
    await http.SignInAsync(PasskeyTwoFactorScheme, new ClaimsPrincipal(marker));

    // ...and bind the ceremony to that user. This replaces the two-factor
    // cookie with one that holds the challenge and the user id.
    var optionsJson = await signIn.MakePasskeyRequestOptionsAsync(user);
    return Results.Content(optionsJson, "application/json");
});

account.MapPost("/2fa/passkey", async (PasskeyTwoFactorRequest r, HttpContext http,
    SignInManager<IdentityUser> signIn, UserManager<IdentityUser> users) =>
{
    var failed = Results.Ok(new { succeeded = false });

    // Who passed the password step?
    var marker = await http.AuthenticateAsync(PasskeyTwoFactorScheme);
    await http.SignOutAsync(PasskeyTwoFactorScheme);

    var userId = marker.Principal?.FindFirstValue(ClaimTypes.NameIdentifier);
    var user = userId is null ? null : await users.FindByIdAsync(userId);
    if (user is null) return failed;

    // Same checks ASP.NET Core Identity does before any sign-in
    if (!await signIn.CanSignInAsync(user) ||
        (users.SupportsUserLockout && await users.IsLockedOutAsync(user)))
    {
        return failed;
    }

    // Reads the challenge and user id from Identity.TwoFactorUserId,
    // verifies the signature, and clears that cookie.
    var assertion = await signIn.PerformPasskeyAssertionAsync(r.Credential);
    if (!assertion.Succeeded || await users.GetUserIdAsync(assertion.User) != userId)
    {
        if (users.SupportsUserLockout) await users.AccessFailedAsync(user);
        return failed;
    }

    // Keep the sign count and authenticator data up to date
    var updatePasskey = await users.AddOrUpdatePasskeyAsync(user, assertion.Passkey);
    if (!updatePasskey.Succeeded) return failed;

    if (users.SupportsUserLockout)
    {
        var resetLockout = await users.ResetAccessFailedCountAsync(user);
        if (!resetLockout.Succeeded) return failed;
    }

    if (r.RememberClient)
    {
        await signIn.RememberTwoFactorClientAsync(user);
    }

    await signIn.SignInWithClaimsAsync(user, isPersistent: false, [new Claim("amr", "mfa")]);
    return Results.Ok(new { succeeded = true });
});

public record Credentials(string Email, string Password);
public record PasskeyTwoFactorRequest(string Credential, bool RememberClient);
public record PasskeyRegistrationRequest(string Credential);
Passing the user into MakePasskeyRequestOptionsAsync(user) binds the ceremony to the user. It fills in allowCredentials with that user’s passkeys (so the browser only offers passkeys that make sense for this login), and it’s what makes the passkey handler reject a passkey from anyone else. The marker cookie then binds that user to the password step: the completion endpoint only signs in if the passkey belongs to the same user who just entered a valid password. Without that comparison, someone could pass the password step with their own account, start a ceremony for another user through a different login endpoint, and complete it with that user’s passkey.
The completion endpoint follows what ASP.NET Core Identity does in its own TwoFactorSignInAsync() for authenticator codes. It checks whether the user can still sign in (their email may need confirming, or they may have been locked out in the meantime), counts failures towards lockout, and stops when saving the passkey or resetting the failed access count doesn’t succeed. After that, it optionally remembers the browser and signs in with an amr claim of mfa.
You might be tempted to call PasskeySignInAsync() here instead, since it already wraps the assertion. It would sign the user in, but it’s built for passwordless sign-in: it doesn’t check the password step, it adds an amr claim of pwd (not mfa), and it doesn’t know about remembering the browser for 2FA.
When users register a passkey, you can flip their TwoFactorEnabled flag so the next password login asks for it. This endpoint assumes your existing registration flow created the passkey creation options for the signed-in user, using MakePasskeyCreationOptionsAsync():
account.MapPost("/passkey", async (PasskeyRegistrationRequest r, HttpContext http,
    UserManager<IdentityUser> users, SignInManager<IdentityUser> signIn) =>
{
    var user = await users.GetUserAsync(http.User);
    if (user is null) return Results.Unauthorized();

    var attestation = await signIn.PerformPasskeyAttestationAsync(r.Credential);
    if (!attestation.Succeeded) return Results.BadRequest(attestation.Failure.Message);

    // The creation options must have been made for this user
    if (attestation.UserEntity.Id != await users.GetUserIdAsync(user)) return Results.BadRequest();

    var addPasskey = await users.AddOrUpdatePasskeyAsync(user, attestation.Passkey);
    if (!addPasskey.Succeeded) return Results.BadRequest(addPasskey.Errors);

    var enableTwoFactor = await users.SetTwoFactorEnabledAsync(user, true);
    if (!enableTwoFactor.Succeeded) return Results.BadRequest(enableTwoFactor.Errors);

    return Results.Ok();
});
The client side
The login page is a regular Razor page. @Html.AntiForgeryToken() renders the antiforgery token in a hidden input (any <form method="post"> using the form tag helper does the same), so the JavaScript can pick it up from there:
@page
<form id="login-form">
    @Html.AntiForgeryToken()
    <input id="email" type="email" autocomplete="username" placeholder="Email" required>
    <input id="password" type="password" autocomplete="current-password" placeholder="Password" required>
    <button type="submit">Log in</button>
    <p id="error" role="alert"></p>
</form>
The token is tied to the signed-in user, but that’s not a problem during the login flow. Until the second factor succeeds, only the two-factor cookies are set, so the user is still anonymous as far as antiforgery is concerned, and the token from the login page stays valid for all three requests. Once the user is fully signed in, redirect to a new page, and it will render a token for that user.
On the client, the second factor is the regular WebAuthn navigator.credentials.get() call. Modern browsers support PublicKeyCredential.parseRequestOptionsFromJSON() and credential.toJSON(), which turn the server’s JSON into WebAuthn options and the credential back into JSON. The post() helper sends the antiforgery token in the RequestVerificationToken header:
document.getElementById('login-form').addEventListener('submit', event => {
    event.preventDefault();
    login(
        document.getElementById('email').value,
        document.getElementById('password').value);
});

async function login(email, password) {
    try {
        const result = await (await post('/account/login', { email, password })).json();
        const succeeded = result.requiresTwoFactor
            ? await passkeySecondFactor()
            : result.succeeded;

        if (succeeded) {
            // Load a new page, with an antiforgery token for the signed-in user
            window.location.href = '/';
        } else {
            showError('Login failed.');
        }
    } catch (error) {
        // For example, the user cancelled the passkey prompt (NotAllowedError)
        showError(`Login failed: ${error.message}`);
    }
}

async function passkeySecondFactor() {
    const options = await (await post('/account/2fa/passkey/options')).json();
    const credential = await navigator.credentials.get({
        publicKey: PublicKeyCredential.parseRequestOptionsFromJSON(options)
    });
    const result = await (await post('/account/2fa/passkey', {
        credential: JSON.stringify(credential.toJSON()),
        rememberClient: false
    })).json();
    return result.succeeded;
}

function post(url, body) {
    const token = document.querySelector('input[name="__RequestVerificationToken"]').value;
    return fetch(url, {
        method: 'POST',
        headers: {
            'Content-Type': 'application/json',
            'RequestVerificationToken': token
        },
        body: body ? JSON.stringify(body) : undefined
    });
}

function showError(message) {
    document.getElementById('error').textContent = message;
}
What you give up by reusing the scheme
Once the passkey options are created, GetTwoFactorAuthenticationUserAsync() returns null. If the user cancels the passkey prompt and wants to fall back to an authenticator app or recovery code, they’ll have to enter their password again.
This one isn’t specific to reusing the scheme: the ceremony state isn’t single-use on the server. Clearing the cookies tells the browser to delete them, but the server doesn’t keep track of which challenges were used, so a copied cookie stays valid until it expires (5 minutes). The stored sign count helps detect a replayed assertion, but only for authenticators that increment it, and many synced passkeys always report 0. If that matters to you, keep a server-side record of used challenges.
If you need the fallback, you can keep both pieces of state side by side. MakePasskeyRequestOptionsAsync() and PerformPasskeyAssertionAsync() are virtual, so a custom SignInManager can override them, call IPasskeyHandler<TUser> directly, and store the passkey state in a cookie scheme of its own (registered with AddCookie("Identity.PasskeyState", ...) and AddSignInManager<T>()). The Identity.TwoFactorUserId cookie then stays untouched until the second factor succeeds.
Wrap-up
ASP.NET Core Identity’s passkey support is built around passwordless sign-in, but because it keeps the ceremony state in the Identity.TwoFactorUserId scheme and binds it to the user you pass in, most of what a second factor needs is already there. Add a token provider, a small cookie that proves the password step happened, and two endpoints, and passkeys work as a second factor.
And if you’re using passkeys as a second factor today, maybe that’s the first step towards letting your users drop the password altogether.