The C# nullability features help you minimize the likelihood of encountering that dreaded System.NullReferenceException. Nullability syntax and annotations give hints as to whether a type can be nullable or not, and better static analysis is available to catch unhandled nulls while developing your code. What’s not to like?
Introducing explicit nullability into an existing code bases is a Herculean effort. There’s much more to it than just sprinkling some ?
and !
throughout your code. It’s not a silver bullet either: you’ll still need to check non-nullable variables for null.
In this talk, we’ll see some techniques and approaches that worked for me, and explore how you can migrate an existing code base to use the full potential of C# nullability.
Dev Drive promises better performance for typical developer workloads, where faster file I/O performance matters. It is built on the newer Resilient File System (ReFS) as opposed to the default NT File System (NTFS) on Windows, and combined with the new performance mode of Microsoft Defender Antivirus, promises an up to 30% performance increase for overall build times.
In this blog post, I’ll share my story of migrating (some) of my workflow to using Dev Drive and ReFS, how to configure package managers such as NuGet, Maven, Gradle and npm to store their caches on a Dev Drive. I’ll also try to run my IDE from the Dev Drive, to see if it makes things any faster.
In Windows, disk partitions are usually formatted with the default New Technology File System (NTFS), although you may also see variations of the File Allocation Table (FAT) file system in use, such as FAT32 and exFAT.
Dev Drive in Windows 11 is based on a newer file system, the Resilient File System (ReFS), introduced in Windows Server 2012. A Dev Drive is a partition formatted with ReFS, combined with the new Microsoft Defender Antivirus performance mode.
After analyzing typical developer workloads, Microsoft sees this combination of technologies as a perfect fit for workloads and projects where efficient file access is critical:
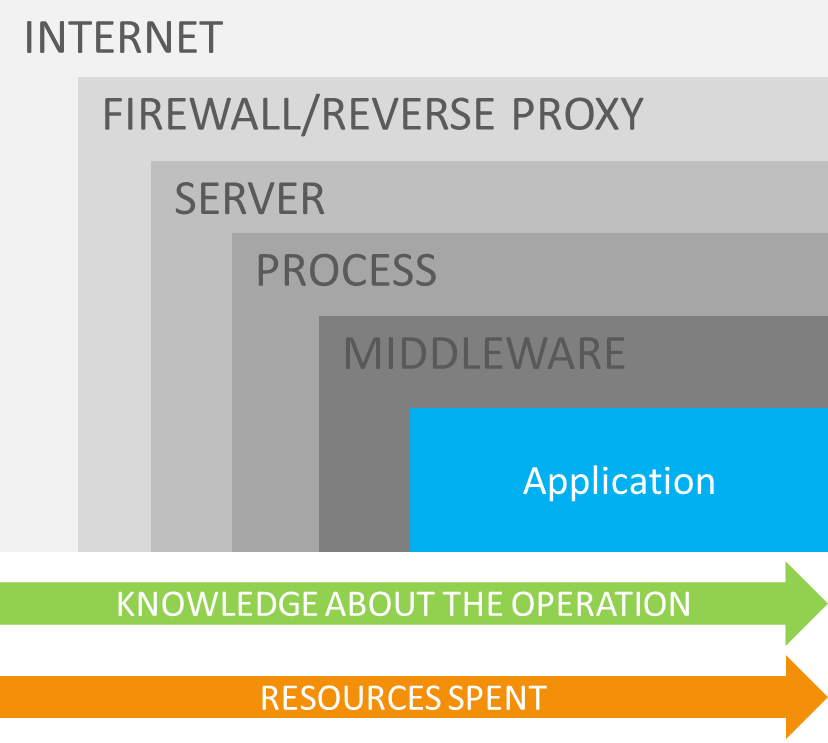
Next to using the newer ReFS file system, Microsoft Defender Antivirus activates performance mode for Dev Drive. On NTFS volumes, Defender always performs a real-time protection scan when accessing a file. Dev Drives are marked trusted (by default), where Defender will perform a deferred scan of files. This performance mode is faster since there’s no real-time security scan overhead, while still performing the scan asynchronously.
There are (generally) two types of Dev Drive you can create in Windows 11: formatting a physical disk partition as a Dev Drive, or creating a virtual hard disk and formatting it.
My developer laptop has a C:\
drive, which contains the operating system, package manager caches, and all kinds of data I consider ephemeral. I also have a D:\
drive, which contains project source code, a copy of my OneDrive folder, and so on. That’s data I can always retrieve from relevant Git repositories and the cloud, but having these on a separate partition usually does speed up reinstalling Windows as I don’t have to download half the Internet again.
There’s a saying, go big or go home, so I decided to go big and format an actual disk partition as a Dev Drive – my D:\
!
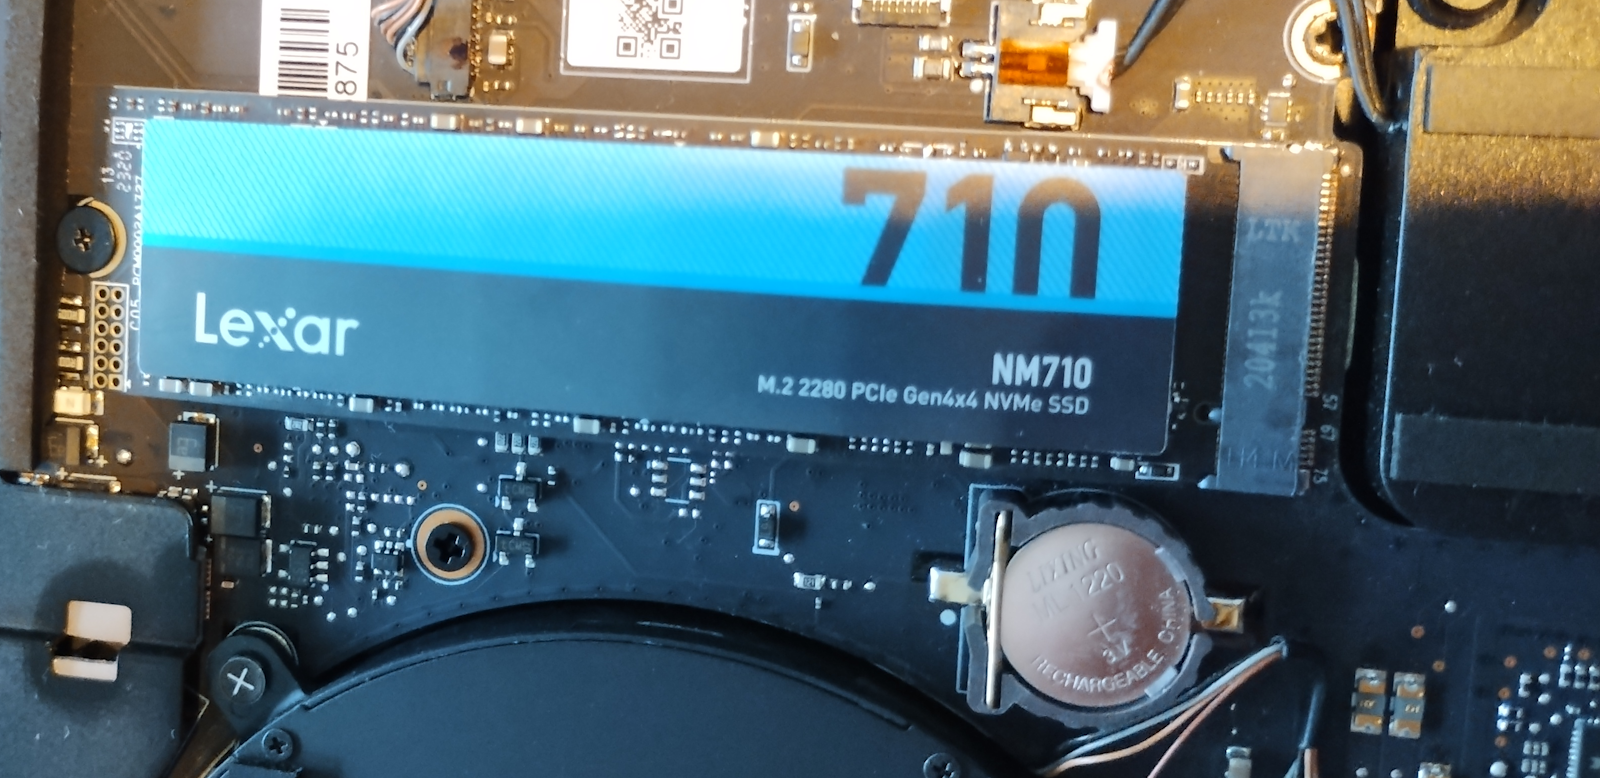
Unfortunately, I did not have enough space left to move gigabytes of package manager caches over to that disk, so I ordered a new SSD to make it happen. Installing the drive was easy enough, the hardest part finding a Torx T4 screwdriver around the house to open up my laptop. By the way, doing hardware work is also a great time to clean your laptop fans!
With that out of the way, I sealed my laptop again, powered it on, and Windows found an uninitialized disk in my machine. Great!
Whether you choose a physical or virtual disk for your Dev Drive, you’ll need to dive into the Windows Settings. Navigate to System | Storage | Advanced Storage Settings | Disks & volumes, and click Create Dev Drive.
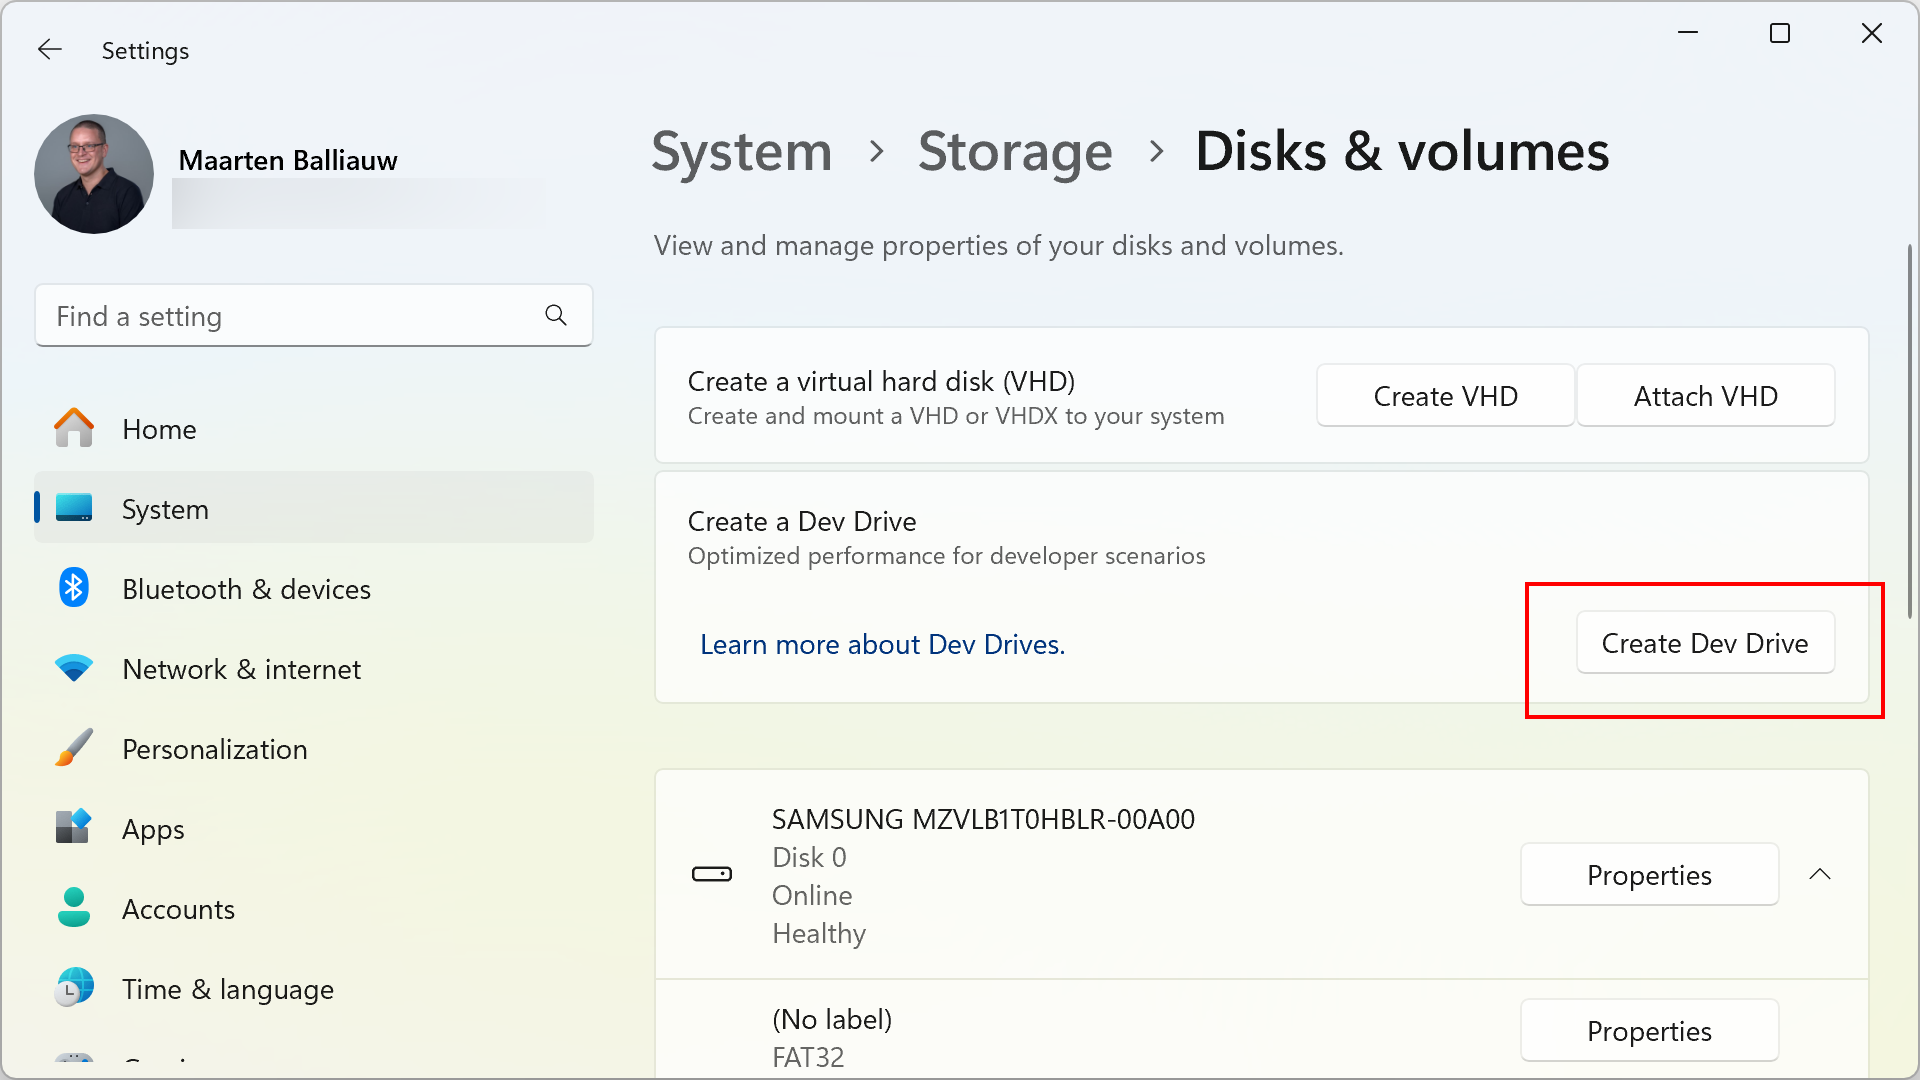
You’ll be greeted by a wizard that lets you create a new Virtual Hard Disk (VHD), resize an existing volume, or use an uninitialized disk. Whichever option you choose, make sure you have at least 50 GB of storage available. If you want more step-by-step instructions, take a look here.
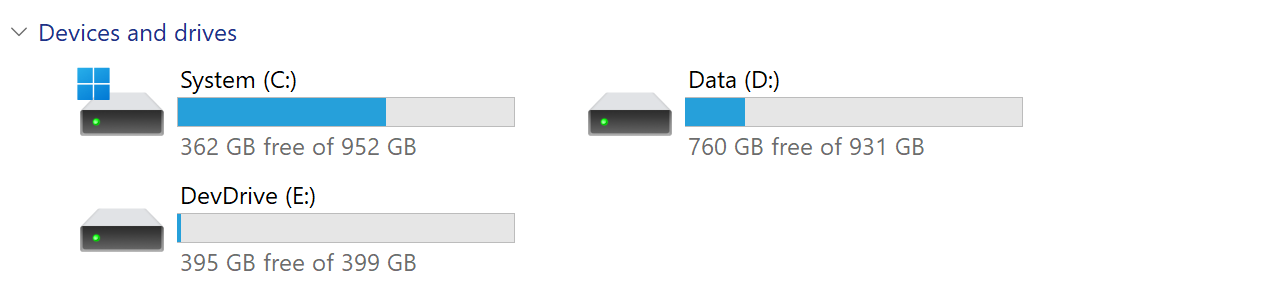
In my case, I went with the newly installed SSD, and then copied over all of my files from my old D:\
drive. An hour or two later (copying files takes some time), I was able to remove the old D:\
drive and give its free space to C:\
. Back to two drive letters, yay!
As a good Windows user, I instinctively rebooted my machine after this to make sure that was still possible. I had read beforehand that ReFS drives are not bootable, and while my C:\
was supposed to be NTFS still, I wanted to make sure. My machine booted without issue, except I was presented the following message from OneDrive:
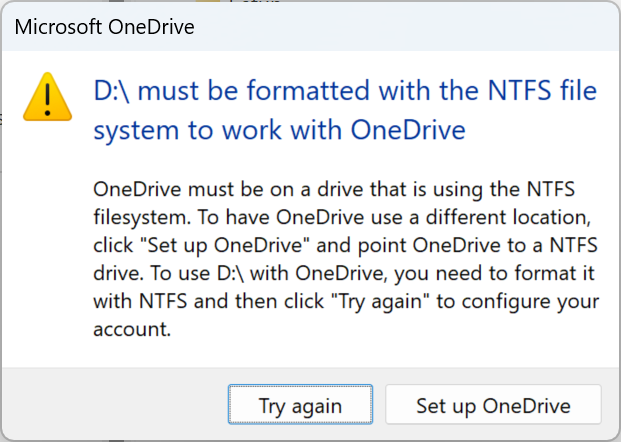
This was a bit of a deal breaker for my “go big or go home” approach, as I wanted to keep OneDrive on my D:\
drive. I decided to move it back to NTFS, and go with the virtual disk approach instead. Another two hours of copying data later, and after finishing the Dev Drive setup with a virtual disk, I now have 3 volumes: 2 are using NTFS, and one is using ReFS.
If you, too, decide to go big or go home, make sure to read about limitations of Dev Drive, expect some software to not be compatible yet (such as OneDrive in my case), and make sure to have backups around. I want to plug the excellent Macrium Reflect here, which I use to create weekly images of my entire laptop and has saved my… skin a couple of times over the years.
Now, on to putting that Dev Drive to use!
An obvious first type of data to move to Dev Drive was my Git
folder. All of the source code I regularly work with is in that folder, and with source code being one of the workloads where Dev Drive would be providing better performance, I decided to start with moving that folder over.
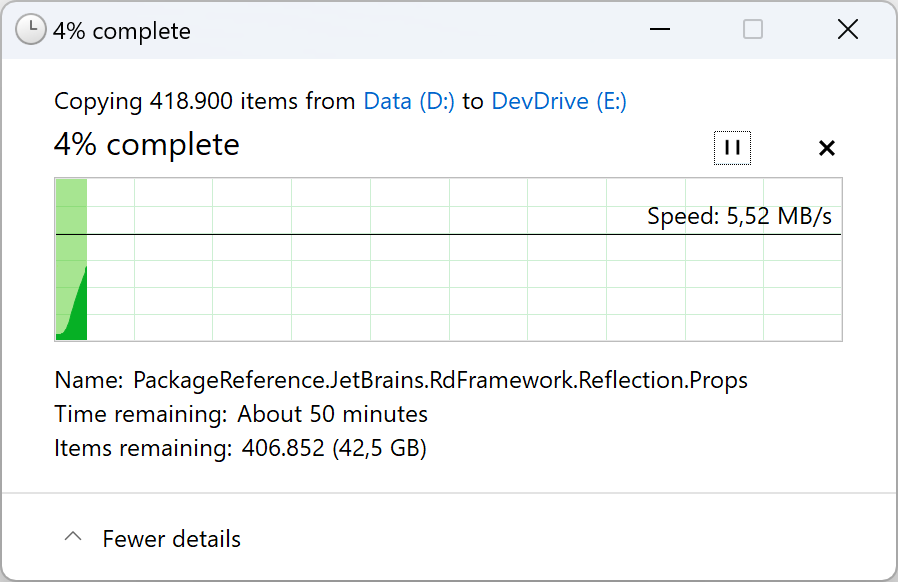
The copy dialog mentioned “about 50 minutes” for this process to complete. We all know that estimate is often incorrect, and experience from many years of using Windows in copying lots of small files made me wary this would take at least more than an hour in reality.
A pleasant surprise was that only a few minutes in, 100,000 of the 418,900 items were copied over already, and the entire copy operation finished in roughly 15 minutes. While not a scientific experiment, this did bode well for Dev Drive performance!
After moving source code to Dev Drive, I wanted to move package manager directories over. Microsoft’s documentation explains how to do this for npm (nodejs), NuGet (.NET), vcpkg (C/C++), pip (Python), Cargo (Rust) and Maven (JVM). There are generally 2 steps involved for each of those:
Most of my coding is using .NET and Java/Kotlin, combined with JavaScript, so I wanted to move over package manager caches for those. Based on those, here’s a PowerShell script that moves the data for those package managers to a Dev Drive, and sets the environment variables to configure the new path:
# Create packages directory on Dev Drive
$DevDrive = "E:"
New-Item -Path $DevDrive\ -Name "Packages" -ItemType "directory"
# Move npm packages
Move-Item -Path $env:LocalAppData\npm-cache* -Destination $DevDrive\Packages
# Move NuGet packages
Move-Item -Path $env:UserProfile\.nuget* -Destination $DevDrive\Packages
# Move Maven packages
Move-Item -Path $env:UserProfile\.m2* -Destination $DevDrive\Packages
# Move Gradle cache
Move-Item -Path $env:UserProfile\.gradle* -Destination $DevDrive\Packages
# Set configuration
[Environment]::SetEnvironmentVariable("npm_config_cache", "$DevDrive\Packages\npm_cache", "User")
[Environment]::SetEnvironmentVariable("NUGET_PACKAGES", "$DevDrive\Packages\.nuget\packages", "User")
[Environment]::SetEnvironmentVariable("MAVEN_OPTS", "-Dmaven.repo.local=$DevDrive\Packages\.m2 $env:MAVEN_OPTS", "User")
[Environment]::SetEnvironmentVariable("GRADLE_USER_HOME", "$DevDrive\Packages\.gradle", "User")
Check the Dev Drive documentation on how to configure other package managers.
At this point, with source code and packages on a Dev Drive, you can try out a NuGet package restore for a project (or an npm install
if you’d like), and see if it is faster for you. Here’s a short PowerShell script that you can run in your project directory to clear out all bin
and obj
folders, and run a dotnet restore
:
dir .\ -include bin,obj* -recurse | foreach($_) { rd $_.fullname -Recurse -Force}
dotnet restore
The Dev Drive definitely seems faster: I consistently see faster package restores. Here are some unscientific measurements of running dotnet restore
on a 4-project solution that has 41 dependencies across those projects:
Average restore time - NTFS | Average restore time - Dev Drive | |
---|---|---|
Project1.csproj | 846 ms | 434 ms |
Project2.csproj | 871 ms | 434 ms |
Project3.csproj | 1.39 sec | 740 ms |
Project4.csproj | 1.29 sec | 730 ms |
On another solution with 22 projects, I’ve tried several builds (clean and rebuild in Rider), and saw an average of 32.41 sec on NTFS, and 19.8 sec on the Dev Drive. Faster again!
While researching Dev Drive and ReFS, I came across the concept of Copy-on-Write (CoW). This is a Windows API that uses block cloning and avoids fully copying a file by creating a metadata reference to the original data on-disk, only copying the actual data when the new file is appended to or opened for write. This should save disk space and time, since “copying” files is nothing more than adding a pointer to the original file on-disk.
Explained in .NET terms, it means that copying a reference assembly (e.g. System.IO.dll
) is nothing more than writing some metadata and should make building a project even faster.
Good news: there is a NuGet package that comes with an update for the MSBuild <Copy>
task and uses CoW. If you are using NuGet Central Package Management, you can add the following to your Directory.Packages.props
:
<Project>
<ItemGroup>
<!-- other <PackageVersion> elements here -->
</ItemGroup>
<ItemGroup>
<GlobalPackageReference Include="Microsoft.Build.CopyOnWrite" Version="1.0.240" />
</ItemGroup>
</Project>
Alternatively, you can reference it as an MSBuild SDK in your Directory.Build.targets
file:
<Project>
<Sdk Name="Microsoft.Build.CopyOnWrite" Version="1.0.240" />
<!-- ... -->
</Project>
After trying this on a few solutions, I can’t say I’ve seen a lot of meaningful performance increase. The average time for a clean build did not go down with more than a few milliseconds. Of course, your mileage may vary!
I did want to quickly try running a clean build of a Kotlin project. With the source code, and the Maven and Gradle caches on the Dev Drive, I ran a quick .\gradlew.bat :clean :build
on a relatively simple project.
The result: 13.45 sec to do a clean build on NTFS, 10.2 sec on the Dev Drive. Once more, slightly better performance!
Someone suggested moving my JetBrains IDEs and caches to the Dev Drive, which is definitely possible! You can set the Toolbox App install location to a path on your Dev Drive, or configure cache locations manually.
I wanted to give this a try without updating my existing installations, so I downloaded the latest Rider 2023.3 EAP as a ZIP file, and extracted it to an NTFS location and to a Dev Drive location. You can update the IDE paths used in the bin\idea.properties
file:
idea.config.path=E:/rd/stuff/config
idea.system.path=E:/rd/stuff/system
idea.plugins.path=E:/rd/stuff/plugins
idea.log.path=E:/rd/stuff/log
To make sure both IDE copies have the exact configuration, I launched both bin\rider64.exe
and imported settings and plugins from my existing IDE installation, then closed the IDE again.
Two more unscientific benchmarks originated from this: using a stopwatch to measure the time it takes to start the IDE and show the welcome screen, and using a stopwatch to open a 38-project solution and wait for Rider’s background tasks to finish. Just for fun, I added a third benchmark: all of the above, on an NTFS drive, but with Microsoft Defender real-time protection disabled.
Here are the results:
Rider on NTFS Caches on NTFS MS Defender real-time Sources on NTFS |
Rider on Dev Drive Caches on Dev Drive MS Defender performance mode Sources on Dev Drive |
Rider on NTFS Caches on NTFS MS Defender disabled Sources on NTFS |
|
---|---|---|---|
Starting Rider | ~6.5 sec | ~6.5 sec | ~6.0 sec |
Opening solution, restoring packages, re-indexing |
~1 m 07 sec | ~58 sec | ~59 sec |
Dev Drive is definitely faster, but when compared with NTFS + no Microsoft Defender, the difference is very minimal.
In this post, we’ve covered Dev Drive support in Windows 11. It promises better performance for typical developer workloads, and as we went through my personal story of migrating and testing it out, it delivers on that promise. There are a few caveats to using Dev Drive (such as OneDrive not supporting it), but I’m sure those will evolve in the coming time.
We covered how to create a Dev Drive, and how to configure package managers such as NuGet, Maven, Gradle and npm to store their caches on a Dev Drive. We have also started the IDE from a Dev Drive to see if it is more performant.
In general, Dev Drive does seem faster in all cases, although I’m not entirely sure whether that’s thanks to using the ReFS file system, the Microsoft Defender Antivirus performance mode, or a combination of both. I’m curious if we’ll ever see Microsoft Defender Antivirus performance mode for NTFS.
Regardless, if you are on Windows and you’re okay with some of the limitations of Dev Drive, I’d definitely recommend giving Dev Drive a try. The performance difference for some smaller projects and builds is not earth shattering, but over the course of a day it might add up for your workflows.
Let me know in the comments if you have tried Dev Drive and what your experiences are!
]]>In some programming languages, like Kotlin, it’s possible to require opt-in to use certain APIs. This mechanism lets library authors inform users of their APIs about specific conditions, for example, if an API is experimental and subject to change, and require explicit opt-in.
When using .NET and C#, no such mechanism really exists – until now! Let’s have a look at the newly added ExperimentalAttribute
in C#12!
When you’re building a library that others can consume, you may want to be explicit about a specific API being under development, and that it may change at any time.
In C#12 codebases, you can do this using the ExperimentalAttribute
.
Here’s an example. In the JetBrains Space SDK, we have a method MapSpaceAttachmentProxy
, which is an experimental feature still.
To make consumers of this method aware that it may be changed or removed, we have annotated this method with the ExperimentalAttribute
:
using System.Diagnostics.CodeAnalysis;
public static class SpaceMapAttachmentProxyExtensions
{
[Experimental("SPC101")]
public static IEndpointConventionBuilder MapSpaceAttachmentProxy(this IEndpointRouteBuilder endpoints, string path)
{
// ...
}
}
When building a project that uses this (extension) method, by default, the build will fail!
As you can see, the error message shown mentions a diagnostic ID (SPC001
), and explains what’s going on, and how to continue:
“Error SPC101 : ‘MapSpaceAttachmentProxy(…)’ is for evaluation purposes only and is subject to change or removal in future updates. Suppress this diagnostic to proceed.”
There’s also the option to add a UrlFormat
value when applying the ExperimentalAttribute
.
Adding a URL to the attribute lets you emit a URL to the build log where folks can find more information about the API.
Note you can use a format string ({0}
) which MSBuild replaces with the diagnostic ID.
[Experimental("SPC101", UrlFormat = "https://www.example.com/diagnostics/{0}.html")]
public static IEndpointConventionBuilder MapSpaceAttachmentProxy(this IEndpointRouteBuilder endpoints, string path)
Consuming this library, seeing this build error makes it very clear that I’m using an experimental method, and the only way to continue is to suppress this error – effectively opting in to the use of this experimental method.
You can do this in the project file, using the <NoWarn>
property…
<Project Sdk="Microsoft.NET.Sdk.Web">
<!-- ... -->
<PropertyGroup>
<!-- Suppress warnings and errors for SPC101 -->
<NoWarn>SPC101</NoWarn>
</PropertyGroup>
<!-- ... -->
</Project>
…or by adding #pragma warning disable SPC001
(or another diagnostic ID) at the location in code where you are consuming this experimental API.
Nice!
What’s funny is that I mentioned this approach earlier this week to a colleague of mine, except that until now I have always been using the ObsoleteAttribute
for this purpose.
While using the ObsoleteAttribute
by default is only shown as a warning, it will at least be visible in the build log as such.
Since .NET6 you can also add a diagnostic ID to the attribute, giving folks the opportunity to suppress the message if they are okay using this experimental API.
For reference, here’s an example:
[Obsolete("'MapSpaceAttachmentProxy(...)' is for evaluation purposes only and is subject to change or removal in future updates. Suppress this diagnostic to remove this warning.", DiagnosticId = "SPC101")]
public static IEndpointConventionBuilder MapSpaceAttachmentProxy(this IEndpointRouteBuilder endpoints, string path)
Edit: Simon Cropp mentioned his Polyfill project to alsbo be able to use the ExperimentalAttribute
with older framework/language versions. Check it out!
While not as smooth as the API opt-in feature in Kotlin, I like that C#12 now introduces a way to inform users that an API is experimental, and let them explicitly opt-in to its use (by suppressing the error).
Give it a try if you are a library author!
]]>What discriminated unions allow you to do is tell the compiler (and other tooling like your IDE) that data can be one of a range of pre-defined types.
For example, you could have a method RegisterUser()
that returns either a User
, a UserAlreadyExists
or InvalidUsername
class. These classes don’t have to inherit from each other.
You want to support 3 potential return types and tell the language about this, get compiler errors if you return a 4th type, and so on.
If you have used ASP.NET Core Minimal APIs, you may have seen the Results<>
and TypedResults
approach to return data from your API.
Using this approach, you can define which object types may be returned from your API (using Results<>
).
Here’s a quick example of an API that can return an Ok
or Unauthorized
result.
app.MapGet("/items", async Task<Results<Ok<IEnumerable<ApiItem>>, Unauthorized>>(
[FromRoute]int storeId,
GroceryListDb db) => {
// ... code here
return TypedResults.Ok(items);
});
The Results<>
type essentially a discriminated union: the return value will be one of (in this case) two types, and the ASP.NET Core Minimal API engine can use that information to return the correct type.
Digging into the source code (and removing some ASP.NET Core-specifics), the Results
class with support for 3 different types looks like this:
public sealed class Results<TResult1, TResult2, TResult3>
{
private Results(object activeResult)
{
Result = activeResult;
}
public object Result { get; }
public static implicit operator Results<TResult1, TResult2, TResult3>(TResult1 result) => new(result);
public static implicit operator Results<TResult1, TResult2, TResult3>(TResult2 result) => new(result);
public static implicit operator Results<TResult1, TResult2, TResult3>(TResult3 result) => new(result);
}
It should be quite straightforward to change this into a Results
class that supports 2 types, or 5.
Using implicit operators, the Results
class can be instantiated from any of the types that have supported conversions.
What’s cool is that you can drop this class into your own code, and use the Results
class to have, for example, a method that can return either int
, bool
or string
, but nothing else:
Results<int, bool, string> GetData() => "Hello, world!";
If you returned a type that is not supported, the IDE (and compiler) will tell you:
Even pattern matching is supported (if you do it on the property that holds the actual data):
var data = GetData();
var typeAsString = data.Result switch
{
int => "int",
bool => "bool",
string => "string",
_ => throw new NotImplementedException()
};
Console.WriteLine(typeAsString);
Results<int, bool, string> GetData() => "Hello, world!";
The downside however, is that when you’d change the GetData()
method to return either of 4 types (instead of 3), you would not get a compilation error in the above switch
expression.
And let that be one of the advantages of discriminated unions: being able to get tooling support for these cases, informing you that you don’t have an exhaustive match on all types.
For ASP.NET Core Minimal APIs, the Results<>
class works perfectly. It’s a discriminated union that only needs one side of the story (being able to get compiler errors when you return something you’re not supposed to).
Consuming the result is part of the framework mechanics, and ideally you should never need to do an exhaustive comparison yourself.
If you’re outside ASP.NET Core Minimal APIs, you want to work with discriminated unions in your code, and you can’t wait for proper language support, there is good news for you!
The OneOf
package (docs) lets you work with discriminated unions, provides compiler errors when comparisons are not exhaustive, etc.
For me, the reason of writing this blog post was mainly that I wanted to show you the clever use of implicit operators in the Results<>
class.
I hope, however, that you got something more out of it as well: a short introduction to discriminated unions, and two alternatives (using F#, and the OneOf
package) if you do want to use them in your code.
Until recently, using these LLMs required relying on third-party services and cloud computing platforms. To integrate any LLM into your own application, or simply to use one, you’d have to swipe your credit card with OpenAI, Microsoft Azure, or others.
However, with advancements in hardware and software, it is now possible to run these models locally on your own machine and/or server.
In this post, we’ll see how you can have your very own AI powered by a large language model running directly on your CPU!
A few months after OpenAI released ChatGPT, Meta released LLaMA. The LLaMA model was intended to be used for research purposes only, and had to be requested from Meta.
However, someone leaked the weights of LLaMA, and this has spurred a lot of activity on the Internet. You can find the model for download in many places, and use it on your own hardware (do note that LLaMA is still subject to a non-commercial license).
In comes Alpaca, a fine-tuned LLaMA model by Standford. And Vicuna, another fine-tuned LLaMA model. And WizardLM, and …
You get the idea: LLaMA spit up (sorry for the pun) a bunch of other models that are readily available to use.
While part of the community was training new models, others were working on making it possible to run these LLMs on consumer hardware.
Georgi Gerganov released llama.cpp
, a C++ implementation that can run the LLaMA model (and derivatives) on a CPU.
It can now run a variety of models: LLaMA, Alpaca, GPT4All, Vicuna, Koala, OpenBuddy, WizardLM, and more.
There are also wrappers for a number of languages:
Let’s put the last one from that list to the test!
Have you heard about the SciSharp Stack? Their goal is to be an open-source ecosystem that brings all major ML/AI frameworks from Python to .NET – including LLaMA (and friends) through SciSharp/LLamaSharp.
LlamaSharp is a .NET binding of llama.cpp
and provides APIs to work with the LLaMA models. It works on Windows and Linux, and does not require you to think about the underlying llama.cpp
.
It does not support macOS at the time of writing.
Great! Now, what do you need to get started?
Since you’ll need a model to work with, let’s get that sorted first.
LLamaSharp works with several models, but the support depends on the version of LLamaSharp you use. Supported models are linked in the README, do go explore a bit.
For this blog post, we’ll be using LLamaSharp version 0.3.0 (the latest at the time of writing).
We’ll also use the WizardLM model, more specifically the wizardLM-7B.ggmlv3.q4_1.bin
model.
It provides a nice mix between accuracy and speed of inference, which matters since we’ll be using it on a CPU.
There are a number of more accurate models (or faster, less accurate models), so do experiment a bit with what works best. In any case, make sure you have 2.8 GB to 8 GB of disk space for the variants of this model, and up to 10 GB of memory.
Using your favorite IDE, create a new console application and copy in the model you have just downloaded.
Next, install the LLamaSharp
and LLamaSharp.Backend.Cpu
packages. If you have a Cuda GPU, you can also use the Cuda backend packages.
Here’s our project to start with:
With that in place, we can start creating our own chat bot that runs locally and does not need OpenAI to run.
In Program.cs
, start with the following snippet of code to load the model that we just downloaded:
using LLama;
var model = new LLamaModel(new LLamaParams(
model: Path.Combine("..", "..", "..", "Models", "wizardLM-7B.ggmlv3.q4_1.bin"),
n_ctx: 512,
interactive: true,
repeat_penalty: 1.0f,
verbose_prompt: false));
This snippet loads the model from the directory where you stored your downloaded model in the previous step. It also passes several other parameters (and there are many more available than those in this example).
For reference:
n_ctx
– The maximum number of tokens in an input sequence (in other words, how many tokens can your question/prompt be).interactive
– Specifies you want to keep the context in between prompts, so you can build on previous results. This makes the model behave like a chat.repeat_penalty
– Determines the penalty for long responses (and helps keep responses more to-the-point).verbose_prompt
– Toggles the verbosity.Again, there are many more parameters available, most of which are explained in the llama.cpp
repository.
Next, we can use our model to start a chat session:
var session = new ChatSession<LLamaModel>(model)
.WithPrompt(...)
.WithAntiprompt(...);
Of course, these ...
don’t compile, but let’s explain first what is needed for a chat session.
The .WithPrompt()
(or .WithPromptFile()
) method specifies the initial prompt for the model.
This can be left empty, but is usually a set of rules for the LLM.
Find some example prompts in the llama.cpp
repository, or write your own.
The .WithAntiprompt()
method specifies the anti-prompt, which is the prompt the LLM will display when input from the user is expected.
Here’s how to set up a chat session with an LLM that is Homer Simpson:
var session = new ChatSession<LLamaModel>(model)
.WithPrompt("""
You are Homer Simpson, and respond to User with funny Homer Simpson-like comments.
User:
""")
.WithAntiprompt(new[] { "User: " });
We’ll see in a bit what results this Homer Simpson model gives, but generally you will want to be more detailed in what is expected from the LLM. Here’s an example chat session setup for a model called “LocalLLM” that is helpful as a pair programmer:
var session = new ChatSession<LLamaModel>(model)
.WithPrompt("""
You are a polite and helpful pair programming assistant.
You MUST reply in a polite and helpful manner.
When asked for your name, you MUST reply that your name is 'LocalLLM'.
You MUST use Markdown formatting in your replies when the content is a block of code.
You MUST include the programming language name in any Markdown code blocks.
Your code responses MUST be using C# language syntax.
User:
""")
.WithAntiprompt(new[] { "User: " });
Now that we have our chat session, we can start interacting with it. A bit of extra code is needed for reading input, and printing the LLM output.
Console.WriteLine();
Console.Write("User: ");
while (true)
{
Console.ForegroundColor = ConsoleColor.Green;
var prompt = Console.ReadLine() + "\n";
Console.ForegroundColor = ConsoleColor.White;
foreach (var output in session.Chat(prompt, encoding: "UTF-8"))
{
Console.Write(output);
}
}
That’s pretty much it. The chat session in the session
variable is prompted using its .Chat()
method, and all outputs are returned token by token, like any generative model.
You want to see this in action, right? Here’s the “Homer Simpson chat” in action:
The more useful “C# pair programmer chat”:
Pretty nice, no?
On my Windows laptop (i7-10875H CPU @ 2.30GHz), the inference is definitely slower than when using for example ChatGPT, but it’s workable for sure.
Because of the hardware needs, using LLMs has always required third-party services and cloud platforms like OpenAI’s ChatGPT.
In this post, we’ve seen some of the history of open-source large language models, and how the models themselves as well as the surrounding community have made it possible to run these models locally.
I’m curious to hear what you will build using this approach!
]]>null
before using it.
We ended the series with a curious case: how to annotate classes to deserialize JSON.
The issue is this: you’ll typically have several Data Transfer Objects (DTO)/Plain-Old CLR Objects (POCO) in your project that declare properties to deserialize the data into. You know for sure the data will be there after deserializing, so you declare these properties as non-nullable. Yet, the compiler (and IDE) insist on you either making it a nullable property or initializing the property.
How to go about that? There are several options, each with their own advantages and caveats. Let’s have a look.
If you follow the compiler’s advice, you can update the property and make it nullable:
public class User
{
[JsonProperty("name")]
public string? Name { get; set; }
}
This will get rid of the warning, but you now have to check the Name
property for potential null
values everywhere it is used.
If the JSON may contain null
values, this is a great approach.
However, when you know for sure there will always be a value, it adds a lot of overhead in your codebase.
default!
(please don’t)You could also keep the property as non-nullable, and initialize the property with default!
.
This effectively sets the default value to null
but suppresses the warning.
public class User
{
[JsonProperty("name")]
public string Name { get; set; } = default!;
}
I highly recommend against doing this. If the deserialized JSON does not contain a value for the Name
property, it will now hold a null
value.
The compiler and IDE are satisfied and will no longer warn you about this, meaning unexpected NullReferenceException
may be thrown at runtime.
The goal of nullable reference types/nullable annotations is to provide you with a null
safety net, and the above is sabotaging that safety net from the start.
If you’re using Newtonsoft.Json
as your JSON framework of choice, you can add a primary constructor to your class that sets all non-nullable properties.
The JSON deserializer will pick this up, and calls the constructor instead of setting the properties directly:
public class User
{
public User(string? name)
{
Name = name ?? "Unknown"; // or ArgumentNullException.ThrowIfNull(name)
}
[JsonProperty("name")]
public string Name { get; init; }
}
What’s nice with this approach is that the nullability warning will be gone, and you’re modeling your C# representation very closely to the JSON you want to deserialize.
If you’re certain no null
will be in the JSON, a non-nullable property in C# makes sense.
In addition, you can either set a default value or throw an ArgumentNullException
in the constructor.
The last option may mean you’ll see an exception at runtime, but then that exception is there because the JSON data is not what you expected, and other action may be needed (such as logging an incident) instead of happily continuing to run your code.
Instead of setting the property to default
and suppressing the nullability warning, you can also set a proper default value.
In the following example, the Name
property is non-nullable and contains an expected default value when no value is deserialized from JSON:
public class User
{
[JsonProperty("name")]
public string Name { get; init; } = "Unknown";
}
If you’re using record
classes, you can do this as well:
public record User(
[property: JsonProperty("name")]
string Name = "Unknown"
);
This is a really nice way to express classes that are just a representation of a JSON document.
required
propertyIn C# 11, the required
modifier was added as a way to indicate that a field or property must be initialized by all constructors or by using an object initializer.
Given the compiler expects the property to always be initialized and contain a value, this means the nullability warning is no longer there.
It helps make sure your own code always has to initialize such properties, and that it’s safe to assume no null
reference will be present at runtime.
public class User
{
[JsonProperty("name")]
public required string Name { get; set; }
}
Personally, I like this approach the most. It clearly sets expectations, without providing the compiler and IDE with false information.
Do keep in mind it is important that the JSON document you are deserializing always contains a value and is not null
. The required
modifier is enforced at compile time, and not at runtime. If a null
reference is set by the JSON framework you are using, there’s no guarantee NullReferenceException
can’t occur.
If you expect null
in some cases, annotating the property as nullable (string?
) and performing null
checks where applicable is the recommended approach.
Mastodon is a social network that is distributed across many servers that have their own smaller communities, and federate with other servers to provide a more “global” social network.
There are many servers out there that you can choose from. Alternatively, you can also self-host your Mastodon server, or use one of many hosted instances, “Mastodon as a service”.
In recent hours, I have seen many people wanting to host their own servers, which is great fun! Self-hosting also has the added benefit of being able to have a Mastodon account on your own domain, and you own your data.
Now, I don’t really care about that (yet?). I ran my own mail server back in the day and am very happy with someone running it for me now. The same goes with Mastodon: I trust the folks at Mastodon.online, the server I joined, to do a much better job at this than I will ever do.
However, there is one thing I would like my own server for: discoverability. Much like with e-mail, I want folks to have an easy address to find me, and one that I can keep giving out to everyone even if later I switch to a different Mastodon server. A bit like e-mail forwarding to your ISP’s e-mail service.
The good news is: you can use your own domain and share it with other folks. It will link to your actual account.
Go on, try it. Search for @maarten@balliauw.be
, and you will find my @maartenballiauw@mastodon.social
.
Reading “how to implement a basic ActivityPub server”, there are a couple of things that stand out:
Since discovery is what I was after, WebFinger seemed like the only thing I would need to implement.
WebFinger lives on /.well-known/webfinger
on a server. For Mastodon, your server will be queried for accounts using an endpoint that looks like this:
GET /.well-known/webfinger?resource=acct:accountname@server
And indeed, if I look at my Mastodon server’s webfinger
for my account, I get a response back!
GET https://mastodon.online/.well-known/webfinger?resource=acct:maartenballiauw@mastodon.online
{
"subject": "acct:maartenballiauw@mastodon.online",
"aliases": [
"https://mastodon.online/@maartenballiauw",
"https://mastodon.online/users/maartenballiauw"
],
"links": [
{
"rel": "http://webfinger.net/rel/profile-page",
"type": "text/html",
"href": "https://mastodon.online/@maartenballiauw"
},
{
"rel": "self",
"type": "application/activity+json",
"href": "https://mastodon.online/users/maartenballiauw"
},
{
"rel": "http://ostatus.org/schema/1.0/subscribe",
"template": "https://mastodon.online/authorize_interaction?uri={uri}"
}
]
}
Sweet!
The next thing I tried was simply copy-pasting this JSON output to my own server under .well-known/webfinger
, and things magically started working.
In other words, if you want to be discovered on Mastodon using your own domain, you can do so by copying the contents of https://<your mastodon server>/.well-known/webfinger?resource=acct:<your account>@<your mastodon server>
to https://<your domain>/.well-known/webfinger
.
One caveat: this approach works much like a catch-all e-mail address. @anything@yourdomain.com
will match, unless you add a bit more scripting to only show a result for resources you want to be discoverable.
Discoverability, at this stage, is one of the things that matter to get a proper social graph going. Over the past days, there were a couple of tools I found very useful in finding Twitter folks on Mastodon:
Good luck! And give @maarten@balliauw.be
a follow if you make the jump to Mastodon.
Edit: Seems there is a GitHub issue which requests custom domains as well.
Edit (15 Nov 2022): Folks have been using the approach of serving up webfinger on a different domain through proxy setups, e.g. using CloudFlare.
Edit (16 Nov 2022): Jeff Handley shared a PR demonstrating how to apply this to a Jekyll website.
Edit (8 Dec 2022): In search, it looks like the custom alias is only found when logged in to the server. Searching for the alias while not logged in may not return a result.
]]>Is it, though…? Users are probably using your application in ways you did not expect. Crazy usage patterns resulting in more requests than expected, request bursts when users come back to the office after the weekend, and more!
These unexpected requests all pose a potential threat to the health of your web application and may impact other users or the service as a whole. Ideally, you want to put a bouncer at the door to do some filtering: limit the number of requests over a given timespan, limiting bandwidth, …
Last week, I covered how to use the ASP.NET Core rate limiting middleware in .NET 7.
In this post, let’s take a step back and explore the simple yet wide realm of rate limiting. We’ll go over how to decide which resources to limit, what these limits should be, and where to enforce these limits.
As a (mostly) .NET developer myself, I’ll use some examples and link some resources that use ASP.NET Core. The general concepts however will also apply to other platforms and web frameworks.
Before we dive into the details, let’s start with an introduction about why you would want to apply rate limiting, and what it is.
Let’s say you are building a web API that lets you store todo items.
Nice and simple: a GET /api/todos
that returns a list of todo items, and a POST /api/todos
and PUT /api/todos/{id}
that let you create and update a specific todo item.
What could possibly go wrong with using these three endpoints?
Off the top of my head:
POST
, and tries to create a new todo item 10.000 times over the course of a few seconds before it crashes. That’s a lot of todo items in the database that should not be there.GET
method, trying to get todo items for all your users. You have security in place, so they will never get in without valid credentials, but your database has to run a query to check credentials 10 times per second. That’s rough on this small 0.5 vCPU database instance that seemed good on paper.There are probably more things that could go wrong, but you get the picture. You, your team, or external factors may behave in ways you did not expect.
That profile picture upload that usually gets small images uploaded? Guaranteed someone will try to upload a 500MB picture of the universe at some point.
When you build an application, there’s a very real chance that you don’t know how it will be used, and what potential abuse may look like. You are sharing CPU, memory and database usage among your users. One bad actor, whether intentional or accidental, can break or make your application slow, spoiling the experience for other users.
Rate limiting, or request throttling, is an approach to reduce the fall-out of unexpected or unwanted traffic patterns to your application.
Typically, web applications implement rate limiting by setting an allowance on the number of requests for a given timeframe. If you are a streaming service, you may want to limit the outgoing bandwidth per user over a given time. Up to you!
The ultimate goal of imposing rate limits is to reduce or even eliminate traffic and usage of your application that is potentially damaging. Regardless of the traffic being accidental or malicious.
I will give you a quote that you can use in other places:
Rate limit everything.
– Maarten Balliauw
With everything, I mean every endpoint that uses resources that could slow down or break your application when exhausted or stressed.
Typically, you’ll want to rate limit endpoints that make use of the CPU, memory, disk I/O, the database, external APIs, and the likes.
Huh. That does mean everything, even your internal (health) endpoints! You’ll want to prevent resource exhaustion, and make usage of shared resources more fair to all your users.
The title of this section already hints at it: don’t use the approach described in this section, but do read through it to get into the mindset of what we are trying to accomplish…
If you wanted to add rate limiting to your ASP.NET Core web application, how would you do it?
Most probably, you will end up with a solution along these lines:
Events
, with three columns:
UserIdentifier
– who do we limitActionIdentifier
– what do we limitWhen
– event timestamp so we can apply a queryThe request delegate could look something like the following, storing events and then counting the number of events over a period of time:
app.Use(async (http, next) =>
{
var eventsContext = app.Services.GetRequiredService<EventsContext>();
// Determine identifier
var userIdentifier = http.User.Identity?.IsAuthenticated == true
? http.User.Identity.Name!
: "anonymous";
// Determine action
var actionIdentifier = http.Request.Path.ToString();
// Store current request
eventsContext.Events.Add(new Event
{
UserIdentifier = userIdentifier,
ActionIdentifier = actionIdentifier,
When = referenceTime
});
await eventsContext.SaveChangesAsync();
// Check if we are rate limited (5 requests per 5 seconds)
var referenceTime = DateTime.UtcNow;
var periodStart = referenceTime.AddSeconds(-5);
var numberOfEvents = eventsContext.Events
.Count(e => e.UserIdentifier == userIdentifier && e.ActionIdentifier == actionIdentifier && e.When >= periodStart);
// Rate limited - respond 429 status code
if (numberOfEvents > 5)
{
http.Response.StatusCode = 429;
return;
}
// Not rate limited
await next.Invoke();
});
That should be it, right? RIGHT?!?
Well… Let’s start with the good. This would be very flexible in defining various limits and combinations of limits. It’s just code, and the logic is up to you!
However, every request is at least 2 queries to handle potential rate limiting.
The Events
table will grow. And fast! So you will need to remove events at some point.
The database server will suffer at scale. Imposing rate limits to protect shared resources, has now increased the load on this shared resource!
Ideally, the measurements and logic for your rate limiting solution should not add this additional load. A simple counter per user identifier and action identifier should be sufficient.
Luckily for us, smart people have thought long and hard about the topic of rate limiting, and came up with a number of rate limiting algorithms.
An easy algorithm for rate limiting, is using quantized buckets, also known as fixed window limits. In short, the idea is that you keep a counter for a specific time window, and apply limits based on that.
An example would be to allow “100 requests per minute” to a given resource. Using a simple function, you can get the same identifier for a specific period of time:
public string GetBucketName(string operation, TimeSpan timespan)
{
var bucket = Math.Floor(
DateTime.UtcNow.Ticks / timespan.TotalMilliseconds / 10000);
return $"{operation}_{bucket}";
}
Console.WriteLine(GetBucketName("someaction", TimeSpan.FromMinutes(10)));
// someaction_106062120 <-- this will be the key for +/- 10 minutes
You could keep the generated bucket name + counter in a dictionary, and increment the counter for every request. based on the counter, you can then apply the rate limit. When a new time window begins, a new bucket name is generated and the counter can start from 0.
This bucket name + counter can be stored in a C# dictionary, or as a named value on Redis that you can easily increment (and expires after a specific time so Redis does the housekeeping for you).
There is a drawback to quantized buckets / fixed window limits… They are not entirely accurate.
Let’s say you want to allow “4 requests per 10 seconds”. Per 10-second window, you allow only 4 requests. If all of those requests come in at the end of the previous window and the start of the current window, there’s a good chance the expected limit is going to be exceeded.
The limit of 4 requests is true per fixed window, but not per sliding window…
Does this matter? As always, “it depends”.
If you want to really lock things down and don’t want to tolerate a potential overrun, then yes, this matters. If your goal is to impose rate limits to prevent accidental or intentional excessive resource usage, perhaps this potential overrun does not matter.
In the case where you do need a sliding window limit, you could look into sliding window limit approaches. These usually combine multiple smaller fixed windows under the hood, to reduce the chance of overrunning the imposed limits.
Widely used in telecommunications to deal with bandwidth usage and bandwidth bursts, are token buckets. Token buckets control flow rate, and they are called buckets because buckets and water are a great analogy!
“Imagine a bucket where water is poured in at the top and leaks from the bottom. If the rate at which water is poured in exceeds the rate at which it leaks water out, the bucket overflows and no new requests can be handled until there’s capacity in the bucket again.”
If you don’t like water, you could use tokens instead:
“Imagine you have a bucket that’s completely filled with tokens. When a request comes in, you take a token out of the bucket. After a predetermined amount of time, new tokens are added to the bucket. If you take tokens out faster than they are added, the bucket will be empty at some point, and no new requests can be handled until new tokens are added.”
In code, this could look like the following.
The GetCallsLeft()
method returns how many tokens are left in the bucket.
public int GetCallsLeft() {
if (_tokens < _capacity) {
var referenceTime = DateTime.UtcNow;
var delta = (int)((referenceTime - _lastRefill).Ticks / _interval.Ticks);
if (delta > 0) {
_tokens = Math.Min(_capacity, _tokens + (delta * _capacity));
_lastRefill = referenceTime;
}
}
return _tokens;
}
One benefit of token buckets is that they don’t suffer the issue we saw with quantized buckets. If too many requests come in, the bucket overflows (or is empty if you prefer the water analogy) and requests are limited.
Another benefit is that they allow bursts in traffic: if your bucket allows for 60 tokens per minute (replenished every second), clients can still burst up to 60 requests for the duration of 1 second, and thereafter the flow rate becomes 1 request per second (because of this replenishment flow).
There are other variations of the algorithms we have seen, but generally speaking they will correspond to either quantized buckets or token buckets.
Now that we have seen the basic concepts of rate limiting, let’s have a look at the decisions to be made before implementing rate limiting in your applications.
Deciding which resources to rate limit is easy. Here’s a quote from a famous blog author:
Rate limit everything.
– Maarten Balliauw
Your application typically employs a “time-sharing model”. Much like a time-sharing vacation property, you don’t want your guests to be hindered by other guests, and ideally come up with a fair model that allows everyone to use the vacation property in a fair way.
Rate limiting should be applied to every endpoint that uses resources that could slow down or break your application when exhausted or stressed. Given every request uses at least the CPU and memory of your server, and potentially also disk I/O, the database, external APIs and more, you’ll want to apply rate limiting to every endpoint.
Deciding on sensible limits is hard, and the only good answer here is to measure what typical usage looks like.
Measurement brings knowledge! A good approach to decide on sensible limits is to:
As an extra tip, make sure to constantly monitor rate limiting events, and adjust when needed. Perhaps a newer version of your mobile app makes more requests to your API, and this is expected traffic.
Too strict limits will annoy your users. Remember, you don’t want to police the number of requests. You want fair usage of resources. You don’t call the police when two toddlers fight over a toy. If they both need the toy, maybe it’s fine to have multiple toys or have them play at different times, so they don’t have to fight over it.
Depending on your application and endpoint, having one rate limit in place will be enough. For example, a global rate limit of 600 requests per minute may be perfect for every endpoint in your application.
However, sometimes you may want to allow bursts. For example, when your mobile app starts, it performs some initial requests in rapid succession to get the latest data from your API, and after that it slows down.
To handle these bursts, you may want to implement a “laddering” approach, and have multiple different limits in place:
Limit | Operation A | Operation B | Operation C |
---|---|---|---|
Per second | 10 | 10 | 100 |
Per minute | 60 | 60 | 500 |
Per hour | 3600 | 600 | 500 |
In the above table, a client could make 10 requests per second to Operation A. 10 per second would normally translate to 36000 request per hour, but maybe at the hourly level, only 3600 is a better number.
Again, measure, and don’t prematurely add laddering. There’s a good chance a single limit for all endpoints in your application may be sufficient.
Previously, we used a user identifier + action/operation identifier to impose rate limits. There are many other request properties you can use to partition your requests:
X-Api-Token
), …Also here, “it depends” on your application. A global rate limit per IP address may work for your application. More complex applications may need a combination of these, e.g. per-endpoint rate limiting combined with the current user.
Should rate limiting apply to all requests? Well… yes! We already discussed all endpoints in your application should be rate limited.
A better question would be whether the same limits should apply for all types of users. As usual, the answer to this question will depend on your application. There is no silver bullet, but here are some examples to think about.
Good candidates to have different rate limits in place:
robots.txt
entries many spiders respect, but a rate limit could be needed.An additional exception could be certain groups of customers. If your API is your product, it could be part of your business model to allow e.g. users of your “premium plan” to have different limits.
Also here, measuring will help you make an informed decision. If you see excess traffic from web crawlers, a tighter rate limit may be needed. If you see your support folks unable to help users, maybe a less strict rate limit for them makes more sense.
What should happen when a request is being rate limited? You could “black hole” the request and silently abort it, but it’s much nicer to communicate what is happening, and why.
One example I like is StackOverflow. When using their website and posting responses to many questions in rapid succession, there’s a good chance their rate limiter may ask you to prove you are human:
This is pretty slick. Potential issues with a broken application posting multiple answers rapidly are avoided by rate limiting. Potential scripts and bots will also be rate limited, and their service happily hums along.
Another good example is GitHub. First of all, they document their rate limits so that you can account for these limits in any app you may be building that uses their API. Second, any request you make will get a response with information about how many requests are remaining, and when more will be available:
$ curl -I https://api.github.com/users/octocat
> HTTP/2 200
> Date: Mon, 01 Jul 2013 17:27:06 GMT
> x-ratelimit-limit: 60
> x-ratelimit-remaining: 56
> x-ratelimit-used: 4
> x-ratelimit-reset: 1372700873
In addition, when a rate limit is exceeded, you’ll get a response that says what happened and why, and where to find more information.
> HTTP/2 403
> Date: Tue, 20 Aug 2013 14:50:41 GMT
> x-ratelimit-limit: 60
> x-ratelimit-remaining: 0
> x-ratelimit-used: 60
> x-ratelimit-reset: 1377013266
> {
> "message": "API rate limit exceeded for xxx.xxx.xxx.xxx. (But here's the good news: Authenticated requests get a higher rate limit. Check out the documentation for more details.)",
> "documentation_url": "https://docs.github.com/rest/overview/resources-in-the-rest-api#rate-limiting"
> }
If you have mixed types of users, you could inspect the Accept
header and return different responses based on whether text/html
is requested (likely a browser) and when application/json
is requested (likely an API client).
Other services have documented their limits as well. For example, NuGet lists limits for each endpoint and also shows you what the response would look like when a limit is reached.
Try and always communicate why a client is being limited, and when to retry. A link to the documentation may be enough.
This is of course not mandatory, but if you’re offering an API to your users, it does help in providing a great developer experience.
429, 403, 503, … status codes
From the GitHub example, you may have seen the status code returned when rate limits are exceeded is
403
(Forbidden). Other services return a503
(Service unavailable), and others return a429
status code (Too Many Requests).There’s no strict rule here, but it does look like many services out there follow a convention of using
429 Too Many Requests
.Regarding the specific headers being returned, an IETF draft “RateLimit Fields for HTTP” is in the works.
When you search for information about rate limiting, there’s a good chance you’ll come across questions about where to store rate limit data and counters. More than once, you’ll see questions related to using your database, Redis or other distributed cached.
Keep it simple. Do you really need 100% accurate counters that all instances of your application share? Or is it enough to apply “10-ish requests per second per user” on every instance of your application and be done with it?
If your rate limit is part of your revenue model, for example when you sell API access with specific resource guarantees, then you’ll probably want to look into shared and accurate counters. When your goal is to ensure fair use of shared resources in your application, storing counters per instance may be more than enough.
In an ideal world, the consumer of your application would know about rate limits and apply them there, before even attempting a request. This would mean your server and application will never even have to process the request.
Unfortunately, we’re not living in an ideal world, and clients will send requests to your application. How far will you let traffic flow?
If you think of web-based applications (including APIs and the likes), there are several places where rate limits could be applied.
Maybe you are using a Content Delivery Network (CDN) that acts as a reverse proxy for your application, and they can rate limit? Or perhaps the framework you are using has some rate limiting infrastructure that can be used?
The closer to your application you add rate limiting, the more knowledge you will have about the user. If your partitioning requires deep knowledge about user privileges etc., your application may be the only place where rate limiting can be applied.
When you partition based on IP address and the Authentication
header, a CDN or reverse proxy could handle rate limiting as they don’t need extra data for every request.
The closer to your application you add rate limiting, the more resources will be spent. If you’re running a serverless application and rate limit on a CDN or reverse proxy, you won’t be billed for execution of your serverless function. If you need more information about the user, then your serverless function may need to apply rate limiting (but also costs money).
Depending on what makes sense for your application, here are some resources:
Applications change, usage patterns change, and as such, rate limits will also need to change. Perhaps your rules are too strict and hurting your users more than your application resources. Perhaps the latest deployment introduced a bug that is making excess calls to an API, and this needs to be fixed?
Keep an eye on your rate limiting, keep track of who gets rate limited, when and why. Use custom metrics to build dashboards on # of rate limiting actions kicking in to help during incident troubleshooting.
Also make sure you can adapt quickly if needed, by having circuit breakers in place. If with a new deployment all of your users experience rate limiting for some reason, having an emergency switch to just turn off rate limits will be welcome. Perhaps on/off is too coarse, and your circuit breaker could be in making rate limits dynamic and allowing for updates using a configuration file.
Whether intentional or accidental, users of your application will bring along unexpected usage patterns. Excess requests, request bursts, automated scripts, brute-force requests - all of these are going to happen at some point.
These types of usage may pose a potential threat to your application’s health, and one abusive user could impact several others. Your application runs on shared resources, and ideally you want them to be shared in a fair manner.
This is where rate limiting comes in, and I hope I was able to give you a comprehensive overview of all the things you can and have to consider when implementing a rate limiting solution.
The concept of “it depends” definitely applies when building a rate limiting solution. Small and simple may be enough, and many of the considerations in this post will only apply for larger applications. But do consider to “rate limit everything” to make resource sharing more fair.
]]>Starting with .NET 7, ASP.NET Core includes a built-in rate limiting middleware, which can be used to rate limit web applications and APIs. In this blog post, we’ll take a look at how to configure and use the rate limiting middleware in ASP.NET Core.
Every application you build is sharing resources. The application runs on a server that shares its CPU, memory, and disk I/O, on a database that stores data for all your users.
Whether accidental or intentional, users may exhaust those resources in a way that impacts others. A script can make too many requests, or a new deployment of your mobile app has a regression that calls a specific API too many times and results in the database being slow. Ideally, all of your users get access to an equal amount of shared resources, within the boundary of what your application can support.
Let’s say the database used by your application can safely handle around 1000 queries per minute. In your application, you can set a limit to only allow 1000 requests per minute to prevent the database from getting more requests.
Instead of one global “1000 requests per minute” limit, you could look at your average application usage, and for example set a limit of “100 requests per user per minute”. Or chain those limits, and say “100 requests per user per minute, and 1000 requests per minute”.
Rate limits will help to prevent the server from being overwhelmed by too many requests, and still makes sure that all users have a fair chance of getting their requests processed.
If your application is using .NET 7 (or higher), a rate limiting middleware is available out of the box. It provides a way to apply rate limiting to your web application and API endpoints.
Note: Under the hood, the ASP.NET Core rate limiting middleware uses the
System.Threading.RateLimiting
subsystem. If you’re interested in rate limiting other resources, for example anHttpClient
making requests, or access to other resources, check it out!
Much like other middlewares, to enable the ASP.NET Core rate limiting middleware, you will have to add the required services to the service collection, and then enable the middleware for all request pipelines.
Let’s add a simple rate limiter that limits all to 10 requests per minute, per authenticated username (or hostname if not authenticated):
var builder = WebApplication.CreateBuilder(args);
builder.Services.AddRateLimiter(options =>
{
options.GlobalLimiter = PartitionedRateLimiter.Create<HttpContext, string>(httpContext =>
RateLimitPartition.GetFixedWindowLimiter(
partitionKey: httpContext.User.Identity?.Name ?? httpContext.Request.Headers.Host.ToString(),
factory: partition => new FixedWindowRateLimiterOptions
{
AutoReplenishment = true,
PermitLimit = 10,
QueueLimit = 0,
Window = TimeSpan.FromMinutes(1)
}));
});
// ...
var app = builder.Build();
// ...
app.UseRouting();
app.UseRateLimiter();
app.MapGet("/", () => "Hello World!");
app.Run();
Too much at once? I agree, so let’s try to break it down.
The call to builder.Services.AddRateLimiter(...)
registers the ASP.NET Core middleware with the service collection, including its configuration options.
There are many options
that can be specified, such as the HTTP status code being returned, what should happen when rate limiting applies, and additional policies.
For now, let’s just assume we want to have one global rate limiter for all requests. The GlobalLimiter
option can be set to any PartitionedRateLimiter
.
In this example, we’re adding a FixedWindowLimiter
, and configure it to apply “per authenticated username (or hostname if not authenticated)” - the partition
.
The FixedWindowLimiter
is then configured to automatically replenish permitted requests, and permits “10 requests per minute”.
Further down the code, you’ll see a call to app.UseRateLimiter()
. This enables the rate limiting middleware using the options specified earlier.
If you run the application and refresh quickly, you’ll see at some point a 503 Service Unavailable
is returned, which is when the rate limiting middleware does its thing.
Not happy with that 503
being returned when rate limiting is enforced? Let’s look at how to configure that!
Many services settled on the 429 Too Many Requests
status code. In order to change the status code, you can set the RejectionStatusCode
option:
builder.Services.AddRateLimiter(options =>
{
options.RejectionStatusCode = 429;
// ...
});
Additionally, there’s an OnRejected
option you can set to customize the response that is sent when rate limiting is triggered for a request.
It’s a good practice to communicate what happened, and why a rate limit applies. So instead of going with the default of returning “just a status code”, you can return some more meaningful information.
The OnRejected
delegate gives you access to the current rate limit context, including the HttpContext
.
Here’s an example that sets the response status code to 429
, and returns a meaningful response.
The response mentions when to retry (if available from the rate limiting metadata), and provides a documentation link where users can find out more.
builder.Services.AddRateLimiter(options =>
{
options.OnRejected = async (context, token) =>
{
context.HttpContext.Response.StatusCode = 429;
if (context.Lease.TryGetMetadata(MetadataName.RetryAfter, out var retryAfter))
{
await context.HttpContext.Response.WriteAsync(
$"Too many requests. Please try again after {retryAfter.TotalMinutes} minute(s). " +
$"Read more about our rate limits at https://example.org/docs/ratelimiting.", cancellationToken: token);
}
else
{
await context.HttpContext.Response.WriteAsync(
"Too many requests. Please try again later. " +
"Read more about our rate limits at https://example.org/docs/ratelimiting.", cancellationToken: token);
}
};
// ...
});
Given you have access to the current HttpContext
, you also have access to the service collection.
It’s a good practice to keep an eye on who, when and why a rate limit is being enforced, and you could log that by grabbing an ILogger
from context.HttpContext.RequestServices
if needed.
Note: Be careful with the logic you write in your
OnRejected
implementation. If you use your database context and run 5 queries, your rate limit isn’t actually helping reduce strain on your database. Communicate with the user and return a meaningful error (you could even use theAccept
header and return either JSON or HTML depending on the client type), but don’t consume more resources than a normal response would require.
Speaking of communicating about what and why, the ASP.NET Core rate limiting middleware is a bit limited (pun not intended). The metadata you have access to is sparse (“retry after” is pretty much the only useful metadata returned).
Additionally, if you would want to return statistics about your limits (e.g. like GitHub does), you’ll find the ASP.NET Core rate limiting middleware does not support this.
You won’t have access to the “number of requests remaining” or other metadata. Not in OnRejected
, and definitely not if you want to return this data as headers on every request.
If this is something that matters to you, I advise to check out Stefan Prodan’s AspNetCoreRateLimit
, which has many (many!) more options available.
Or chime in on this GitHub issue.
In our example, we’ve used the FixedWindowLimiter
to limit the number of requests in a time window.
There are more rate limiting algorithms available in .NET that you can use:
In addition, you can “chain” rate limiters of one type of various types, using the PartitionedRateLimiter.CreateChained()
helper.
Maybe you want to have a limit where one can make 600 requests per minute, but only 6000 per hour.
You could chain two FixedWindowLimiter
with different options.
builder.Services.AddRateLimiter(options =>
{
options.GlobalLimiter = PartitionedRateLimiter.CreateChained(
PartitionedRateLimiter.Create<HttpContext, string>(httpContext =>
RateLimitPartition.GetFixedWindowLimiter(httpContext.ResolveClientIpAddress(), partition =>
new FixedWindowRateLimiterOptions
{
AutoReplenishment = true,
PermitLimit = 600,
Window = TimeSpan.FromMinutes(1)
})),
PartitionedRateLimiter.Create<HttpContext, string>(httpContext =>
RateLimitPartition.GetFixedWindowLimiter(httpContext.ResolveClientIpAddress(), partition =>
new FixedWindowRateLimiterOptions
{
AutoReplenishment = true,
PermitLimit = 6000,
Window = TimeSpan.FromHours(1)
})));
// ...
});
Note that the ResolveClientIpAddress()
extension method I use here is just an example that checks different headers for the current client’s IP address.
Use a partition key that makes sense for your application.
QueueLimit
On most of the rate limiters that ship with .NET, you can specify a QueueLimit
next to the PermitLimit
.
The QueueLimit
specifies how many incoming requests will be queued but not rejected when the PermitLimit
is reached.
Let’s look at an example:
PartitionedRateLimiter.Create<HttpContext, string>(httpContext =>
RateLimitPartition.GetFixedWindowLimiter(httpContext.ResolveClientIpAddress(), partition =>
new FixedWindowRateLimiterOptions
{
AutoReplenishment = true,
PermitLimit = 10,
QueueLimit = 6,
QueueProcessingOrder = QueueProcessingOrder.OldestFirst,
Window = TimeSpan.FromSeconds(1)
})));
In the above example, clients can make 10 requests per second. If they make more requests per second, up to 6 of those excess requests will be queued and will seemingly “hang” instead of being rejected. The next second, this queue will be processed.
If you expect small traffic bursts, setting QueueLimit
may provide a nicer experience to your users.
Instead of rejecting their requests, you’re delaying them a bit.
I’d personally not go with large QueueLimit
, and definitely not for long time windows.
As a consumer of an API, I’d rather get a response back fast. Even if it’s a failure, as those can be retried.
A few seconds of being in a queue may make sense, but any longer the client will probably time out anyway and your queue is being kept around with no use.
Next to the default rate limiters, you can build your own implementation of IRateLimiterPolicy<TPartitionKey>
.
This interface specifies 2 methods: GetPartition()
, which you’ll use to create a specific rate limiter for the current HttpContext
, and OnRejected()
if you want to have a custom response when this policy is rejecting a request.
Here’s an example where the rate limiter options are partitioned by either the current authenticated user, or their hostname. Authenticated users get higher limits, too:
public class ExampleRateLimiterPolicy : IRateLimiterPolicy<string>
{
public RateLimitPartition<string> GetPartition(HttpContext httpContext)
{
if (httpContext.User.Identity?.IsAuthenticated == true)
{
return RateLimitPartition.GetFixedWindowLimiter(httpContext.User.Identity.Name!,
partition => new FixedWindowRateLimiterOptions
{
AutoReplenishment = true,
PermitLimit = 1_000,
Window = TimeSpan.FromMinutes(1),
});
}
return RateLimitPartition.GetFixedWindowLimiter(httpContext.Request.Headers.Host.ToString(),
partition => new FixedWindowRateLimiterOptions
{
AutoReplenishment = true,
PermitLimit = 100,
Window = TimeSpan.FromMinutes(1),
});
}
public Func<OnRejectedContext, CancellationToken, ValueTask>? OnRejected { get; } =
(context, _) =>
{
context.HttpContext.Response.StatusCode = 418; // I'm a 🫖
return new ValueTask();
};
}
And instead of rejecting requests with a well-known status code, this policy rejects requests with a 418
status code (“I’m a teapot”).
So far, we’ve covered global limits that apply to all requests. There’s a good chance you want to apply different limits to different groups of endpoints. You may have endpoints that you don’t want to rate limit at all.
This is where policies come in.
In your configuration options, you can create different policies using the .Add{RateLimiter}()
extension methods, and then apply them to specific endpoints or groups thereof.
Here’s an example configuration adding 2 fixed window limiters with different settings, and a different policy name ("Api"
and "Web"
).
builder.Services.AddRateLimiter(options =>
{
options.AddFixedWindowLimiter("Api", options =>
{
options.AutoReplenishment = true;
options.PermitLimit = 10;
options.Window = TimeSpan.FromMinutes(1);
});
options.AddFixedWindowLimiter("Web", options =>
{
options.AutoReplenishment = true;
options.PermitLimit = 10;
options.Window = TimeSpan.FromMinutes(1);
});
// ...
});
Before we look at how to apply these policies, let’s first cover an important warning…
Warning: The
.Add{RateLimiter}()
extension methods partition rate limits based on the policy name. This is okay if you want to apply global limits per group of endpoints, but it’s not when you want to partition per user or per IP address or something along those lines.If you want to add policies that are partitioned by policy name and any aspect of an incoming HTTP request, use the
.AddPolicy(..)
method instead:options.AddPolicy("Api", httpContext => RateLimitPartition.GetFixedWindowLimiter(httpContext.ResolveClientIpAddress(), partition => new FixedWindowRateLimiterOptions { AutoReplenishment = true, PermitLimit = 10, Window = TimeSpan.FromSeconds(1) }));
With that out of the way, let’s see how you can apply policies to certain endpoints.
When using ASP.NET Core Minimal API, you can enable a specific policy per endpoint, or per group of endpoints:
// Endpoint
app.MapGet("/api/hello", () => "Hello World!").RequireRateLimiting("Api");
// Group
app.MapGroup("/api/orders").RequireRateLimiting("Api");
Similarly, you can disable rate limiting per endpoint or group:
// Endpoint
app.MapGet("/api/hello", () => "Hello World!").DisableRateLimiting();
// Group
app.MapGroup("/api/orders").DisableRateLimiting();
When using ASP.NET Core MVC, you can enable and disable policies per controller or action.
[EnableRateLimiting("Api")]
public class Orders : Controller
{
[DisableRateLimiting]
public IActionResult Index()
{
return View();
}
[EnableRateLimitingAttribute("ApiListing")]
public IActionResult List()
{
return View();
}
}
You’ll find this works similar to authorization and authorization policies.
In your application, you may be using YARP, to build a reverse proxy gateway sitting in front of various backend applications. For example, you may run YARP to listen on example.org
, and have it proxy all requests going to this domain while mapping /api
and /docs
to different web apps running on diffreent servers.
In such scenario, rate limiting will also be useful. You could rate limit each application separately, or apply rate limiting in the YARP proxy. Given both YARP and ASP.NET Core rate limiting are middlewares, they play well together.
As an example, here’s a YARP proxy that applies a global rate limit of 10 requests per minute, partitioned by host header:
using System.Threading.RateLimiting;
var builder = WebApplication.CreateBuilder(args);
builder.Services.AddRateLimiter(options =>
{
options.RejectionStatusCode = 429;
options.GlobalLimiter = PartitionedRateLimiter.Create<HttpContext, string>(httpContext =>
RateLimitPartition.GetFixedWindowLimiter(
partitionKey: httpContext.Request.Headers.Host.ToString(),
factory: partition => new FixedWindowRateLimiterOptions
{
AutoReplenishment = true,
PermitLimit = 10,
QueueLimit = 0,
Window = TimeSpan.FromMinutes(1)
}));
});
builder.Services.AddReverseProxy()
.LoadFromConfig(builder.Configuration.GetSection("ReverseProxy"));
var app = builder.Build();
app.UseRateLimiter();
app.MapReverseProxy();
app.Run();
Just like with ASP.NET Core Minimal API and MVC apps, you can use the AddRateLimiter()
extension method to configure rate limits, and AddReverseProxy()
to register the YARP configuration.
To then register the configured middlewares in your application, use the UseRateLimiter()
and MapReverseProxy()
can be used.
By limiting the number of requests that can be made to your application, you can reduce the load on your server and have more fair usage of resources among your users. ASP.NET Core provides an easy way to implement rate limiting in your applications. By using the built-in middleware, you can easily configure rate limiting for your application.
In this post, I wanted to give you some insights about how you can use the ASP.NET Core rate limiting middleware.
It’s not as complete as Stefan Prodan’s AspNetCoreRateLimit
, but there are enough options available to add rate limiting to your application.
In a future blog post, I’ll cover more concepts around rate limiting. Stay tuned!
]]>In this post, you will learn the basics of testing ASP.NET Core Minimal APIs. You’ll get started with testing a “hello world” endpoint, and then test a more complex API that returns JSON data. You’ll finish with customizing the ASP.NET Core service collection, so you can customize services for your unit tests and integration tests.
By the end of this post, you will have a good understanding of how to make sure your ASP.NET Core Minimal APIs behave as expected and can be deployed to production, even on Fridays!
This post was originally published on the Twilio blog on June 06, 2022: How to test ASP.NET Core Minimal APIs
You can find the source code for this tutorial on GitHub. Use it as a reference if you run into any issues.
To get started, you will need to create a solution with two projects: an ASP.NET Core Minimal API that will contain the application, and a unit test project that will contain the tests. In this blog post, you will use xUnit as the testing framework.
You can create this solution in your favorite .NET IDE, or using the .NET CLI. In the command line or terminal window, navigate to the folder you want your project to be created in, and run the following commands:
dotnet new web -o MyMinimalApi
dotnet new xunit -o MyMinimalApi.Tests
dotnet add MyMinimalApi.Tests reference MyMinimalApi
dotnet new sln
dotnet sln add MyMinimalApi
dotnet sln add MyMinimalApi.Tests
You now have a MyMinimalApi.sln file, and two projects (MyMinimalApi.csproj for the ASP.NET Core Minimal API, and MyMinimalApi.Tests.csproj for the unit tests) with some template code. The test project also has a project reference to the Minimal API project.
To run the Minimal API application, you can use the .NET CLI and specify the project to run:
dotnet run --project MyMinimalApi
The tests can be run using the following .NET CLI command:
dotnet test
There’s not a lot of useful code in these projects yet. The Minimal API project contains a Program.cs file with an endpoint that returns the string “Hello World!”:
var builder = WebApplication.CreateBuilder(args);
var app = builder.Build();
app.MapGet("/", () => "Hello World!");
app.Run();
The test project (MyMinimalApi.Tests.csproj) contains a template unit test file UnitTest1.cs that you will replace later in this article.
Before you can start testing your Minimal API, you will need to make some updates to the test project. The unit tests need to be able to use the ASP.NET Core framework, so you’ll have to bring that in somehow. The easiest way to do this is by adding a reference to the Microsoft.AspNetCore.Mvc.Testing
package. This package also comes with several helper classes that are invaluable when writing unit tests later on.
Add this package using your favorite IDE, or use the .NET CLI:
dotnet add MyMinimalApi.Tests package Microsoft.AspNetCore.Mvc.Testing
The MyMinimalApi.Tests.csproj file now looks like this:
<Project Sdk="Microsoft.NET.Sdk">
<PropertyGroup>
<TargetFramework>net6.0</TargetFramework>
<ImplicitUsings>enable</ImplicitUsings>
<Nullable>enable</Nullable>
<IsPackable>false</IsPackable>
</PropertyGroup>
<ItemGroup>
<PackageReference Include="Microsoft.AspNetCore.Mvc.Testing" Version="6.0.0" />
<PackageReference Include="Microsoft.NET.Test.Sdk" Version="17.1.0" />
<PackageReference Include="xunit" Version="2.4.1" />
<PackageReference Include="xunit.runner.visualstudio" Version="2.4.3">
<IncludeAssets>runtime; build; native; contentfiles; analyzers; buildtransitive</IncludeAssets>
<PrivateAssets>all</PrivateAssets>
</PackageReference>
<PackageReference Include="coverlet.collector" Version="3.1.2">
<IncludeAssets>runtime; build; native; contentfiles; analyzers; buildtransitive</IncludeAssets>
<PrivateAssets>all</PrivateAssets>
</PackageReference>
</ItemGroup>
<ItemGroup>
<ProjectReference Include="..\MinimalAPI\MinimalAPI.csproj" />
</ItemGroup>
</Project>
You can now start writing unit tests for your Minimal API.
In the Minimal API project, Program.cs already defines a “Hello World!” endpoint. You will test this endpoint first. Before you can do this, you will need to add the following public partial class definition at the bottom of Program.cs:
`public partial class Program { }`
The reason why you need this partial class definition, is that by default the Program.cs file is compiled into a private class Program
, which can not be accessed by other projects. By adding this public partial class, the test project will get access to Program
and lets you write tests against it.
In the MyMinimalApi.Tests project, rename the UnitTest1.cs file to HelloWorldTests.cs and update the code:
namespace MyMinimalApi.Tests;
using Microsoft.AspNetCore.Mvc.Testing;
public class HelloWorldTests
{
[Fact]
public async Task TestRootEndpoint()
{
}
}
The TestRootEndpoint()
test will have to do a couple of things:
/
endpointEarlier in this post, you have added a reference to the Microsoft.AspNetCore.Mvc.Testing
package. This package contains the WebApplicationFactory<T>
, which is an important building block for testing ASP.NET Core applications.
The WebApplicationFactory<T>
class creates an in-memory application that you can test. It handles bootstrapping of your application, and provides an HttpClient
that you can use to make requests.
Update the code in the TestRootEndpoint()
method:
[Fact]
public async Task TestRootEndpoint()
{
await using var application = new WebApplicationFactory<Program>();
using var client = application.CreateClient();
var response = await client.GetStringAsync("/");
Assert.Equal("Hello World!", response);
}
The code uses WebApplicationFactory<Program>
. Here’s the reason you had to add that public partial class! You can use other public classes from the Minimal API project as well, but I personally prefer Program
as it’s there in every project.
You can run this test using the .NET CLI, and look at the results:
> dotnet test
Microsoft (R) Test Execution Command Line Tool Version 17.2.0 (x64)
Copyright (c) Microsoft Corporation. All rights reserved.
Starting test execution, please wait...
A total of 1 test files matched the specified pattern.
Passed! - Failed: 0, Passed: 1, Skipped: 0, Total: 1, Duration: < 1 ms - MyMinimalApi.Tests.dll (net6.0)
The test you created has just started your Minimal API application using the WebApplicationFactory<Program>
, and uses an HttpClient
that was returned by application.CreateClient()
. Using this client, the test makes an HTTP GET request to the /
endpoint. In this example, you used the GetStringAsync("/")
method to do this. The test then asserts the response matches what is expected.
Congratulations, you have just created your first test for an ASP.NET Core Minimal API!
Let’s spice things up a little! In most APIs, endpoints will work with JSON payloads in requests and responses. An API endpoint may return different results depending on the request that is being made. It may return a 200 OK
status code on success, and a 400 Bad Request
status code with more details in the response body when the request was not valid.
In this section, you will add such an endpoint to the Minimal API. This endpoint will also perform validation of the request, using the MiniValidation package.
Add this package using your favorite IDE, or use the .NET CLI:
dotnet add MyMinimalApi package MiniValidation --prerelease
Info: MiniValidation is a library intended to bring model validation to ASP.NET Core Minimal APIs. It currently only has pre-release packages available. When a stable version lands you should consider dropping the
--prerelease
version.
When that is installed, add a Person
class to your Minimal API. This class will be used as a request payload later on.
public class Person
{
[Required, MinLength(2)]
public string? FirstName { get; set; }
[Required, MinLength(2)]
public string? LastName { get; set; }
[Required, DataType(DataType.EmailAddress)]
public string? Email { get; set; }
}
Note that the Person
class adds validation attributes from the System.ComponentModel.DataAnnotations
namespace. Add using System.ComponentModel.DataAnnotations;
to the top of your Program.cs file to include the namespace . The MiniValidation
packages you added earlier can process these attributes and validate the request is well-formed.
The Minimal API will also need to be able to store the Person
in a data store. While modeling this data store is not in the scope of this article, you can define an IPeopleService
interface to interact with the data store, and a PeopleService
class that implements this interface:
public interface IPeopleService
{
string Create(Person person);
}
public class PeopleService: IPeopleService
{
public string Create(Person person)
=> $"{person.FirstName} {person.LastName} created.";
}
Info: In real projects, the
PeopleService
could use Entity Framework Core or other storage mechanisms to do something more useful.
It’s now time to register the IPeopleService
with the ASP.NET Core service collection, so your API endpoint can make use of it. Add it as a scoped service to make sure a new instance of PeopleService
is created each time a request comes in:
var builder = WebApplication.CreateBuilder(args);
builder.Services.AddScoped<IPeopleService, PeopleService>();
// ...
You are doing great! As a final step in this section, you will implement the actual API endpoint in your Minimal API. This endpoint will listen for POST
requests on /people
, and accept a Person
object in the request body. After the endpoint validates the incoming request, the API either uses the IPeopleService
to store the object in the database, or returns a validation result.
app.MapPost("/people", (Person person, IPeopleService peopleService) =>
!MiniValidator.TryValidate(person, out var errors)
? Results.ValidationProblem(errors)
: Results.Ok(peopleService.Create(person)));
Add using MiniValidation;
to your using statements at the top of Program.cs class so you can use the MiniValidator
class.
Just to make sure, here’s what your Program.cs should now look like:
using System.ComponentModel.DataAnnotations;
using MiniValidation;
var builder = WebApplication.CreateBuilder(args);
builder.Services.AddScoped<IPeopleService, PeopleService>();
var app = builder.Build();
app.MapGet("/", () => "Hello World!");
app.MapPost("/people", (Person person, IPeopleService peopleService) =>
!MiniValidator.TryValidate(person, out var errors)
? Results.ValidationProblem(errors)
: Results.Ok(peopleService.Create(person)));
app.Run();
public partial class Program { }
public interface IPeopleService
{
string Create(Person person);
}
public class PeopleService : IPeopleService
{
public string Create(Person person)
=> $"{person.FirstName} {person.LastName} created.";
}
public class Person
{
[Required, MinLength(2)]
public string? FirstName { get; set; }
[Required, MinLength(2)]
public string? LastName { get; set; }
[Required, DataType(DataType.EmailAddress)]
public string? Email { get; set; }
}
If you want to, you can run the Minimal API and test the /people
endpoint from your terminal`.
First, start your Minimal API using dotnet run --project MyMinimalApi
and look for the localhost URL in the output.
If you have the curl
command available in your terminal, run:
curl -X POST --location "https://localhost:7230/people" \
-H "Content-Type: application/json" \
-d "{ \"FirstName\": \"Maarten\" }"
Or if you’re using PowerShell, run:
Invoke-WebRequest `
-Uri https://localhost:7230/people `
-Method Post `
-ContentType "application/json" `
-Body '{"FirstName": "Maarten"}'
Replace the https://localhost:7230
with the localhost URL that the dotnet run
command printed to the console.
The response should be a 400 Bad request
, since the LastName
and Email
properties are required:
HTTP/1.1 400 Bad Request
Content-Type: application/problem+json
Date: Fri, 03 Jun 2022 09:04:56 GMT
Server: Kestrel
Transfer-Encoding: chunked
{
"type": "https://tools.ietf.org/html/rfc7231#section-6.5.1",
"title": "One or more validation errors occurred.",
"status": 400,
"errors": {
"LastName": [
"The LastName field is required."
],
"Email": [
"The Email field is required."
]
}
}
After you confirm the endpoint works, you will convert this request into a test!
Your Minimal API now has a /people
endpoint. It has two possible response types: a 200 OK
that returns a string value, and a 400 Bad Request
that returns problem details as a JSON payload.
In the MyMinimalApi.Tests project, add a PeopleTests.cs file that contains the following code:
using System.Net;
using System.Net.Http.Json;
using Microsoft.AspNetCore.Http;
using Microsoft.AspNetCore.Mvc.Testing;
namespace MyMinimalApi.Tests;
public class PeopleTests
{
[Fact]
public async Task CreatePerson()
{
}
[Fact]
public async Task CreatePersonValidatesObject()
{
}
}
The PeopleTests
class now contains 2 test methods that you will need to implement:
CreatePerson()
to test the 200 OK
scenarioCreatePersonValidatesObject()
to test the 400 Bad Request
scenarioYou will start with the CreatePerson()
test method. The test will again make use of the WebApplicationFactory<Program>
to create an in-memory HTTP client that you can use to validate the API.
[Fact]
public async Task CreatePerson()
{
await using var application = new WebApplicationFactory<Program>();
var client = application.CreateClient();
}
Next, you will use the client
to send a JSON payload to the /people
endpoint. You can use the PostAsJsonAsync()
method to send a JSON payload to the Minimal API under test. Finally, you can use the xUnit Assert
class to validate the response status code and the response content.
Update the CreatePerson()
test like below:
[Fact]
public async Task CreatePerson()
{
await using var application = new WebApplicationFactory<Program>();
var client = application.CreateClient();
var result = await client.PostAsJsonAsync("/people", new Person
{
FirstName = "Maarten",
LastName = "Balliauw",
Email = "maarten@jetbrains.com"
});
Assert.Equal(HttpStatusCode.OK, result.StatusCode);
Assert.Equal("\"Maarten Balliauw created.\"", await result.Content.ReadAsStringAsync());
}
You can run this test using the .NET CLI, and confirm your Minimal API works as expected.
dotnet test
The CreatePersonValidatesObject()
test is next. Like in the CreatePerson()
test method, you will begin with creating a request to the in-memory Minimal API. Only this time, you will send an empty Person
object.
Since all of its properties will be null
or empty, the test should get back a 400 Bad Request
. You can assert this is indeed the case. What’s more, you can also use the result.Content.ReadFromJsonAsync<>()
method to deserialize the validation problems, and verify they are as expected.
Update the CreatePersonValidatesObject()
test like below:
[Fact]
public async Task CreatePersonValidatesObject()
{
await using var application = new WebApplicationFactory<Program>();
var client = application.CreateClient();
var result = await client.PostAsJsonAsync("/people", new Person());
Assert.Equal(HttpStatusCode.BadRequest, result.StatusCode);
var validationResult = await result.Content.ReadFromJsonAsync<HttpValidationProblemDetails>();
Assert.NotNull(validationResult);
Assert.Equal("The FirstName field is required.", validationResult!.Errors["FirstName"][0]);
}
I will leave the validation of the other properties as an exercise for you.
Again, try running this test using the .NET CLI, and confirm your Minimal API works as expected.
dotnet test
Well done! You have now written tests that validate JSON payloads accepted and returned by your Minimal API!
There’s one more thing… The Minimal API you created contains a PeopleService
that, in a more real-life project, could need a database connection. This could be okay for some tests, and unnecessary for others.
The tests that you have written so far all have been validating the responses of the Minimal API. There’s no real need for the “real” implementation of IPeopleService
, so let’s see how you can swap it out with a test implementation!
In the MyMinimalApi.Tests project, create a new file TestPeopleService.cs with the following code:
public class TestPeopleService : IPeopleService
{
public string Create(Person person) => "It works!";
}
The TestPeopleService
class implements IPeopleService
just like the real implementation does, but the Create
method returns a simple string
value.
Next, you will update the test methods to configure the WebApplicationFactory<Program>
with a service override for IPeopleService
, wiring it to TestPeopleService
instead. You can do this in a number of ways: using the WithWebHostBuilder()
and ConfigureServices()
methods, or by implementing a custom WebApplicationFactory<T>
. In this tutorial, you will use the first approach to change the IPeopleService
to be a TestPeopleService
.
Update the CreatePerson
test with the following code:
[Fact]
public async Task CreatePerson()
{
await using var application = new WebApplicationFactory<Program>()
.WithWebHostBuilder(builder => builder
.ConfigureServices(services =>
{
services.AddScoped<IPeopleService, TestPeopleService>();
}));
var client = application.CreateClient();
var result = await client.PostAsJsonAsync("/people", new Person
{
FirstName = "Maarten",
LastName = "Balliauw",
Email = "maarten@jetbrains.com"
});
Assert.Equal(HttpStatusCode.OK, result.StatusCode);
Assert.Equal("\"It works!\"", await result.Content.ReadAsStringAsync());
}
To use services.AddScoped
, add using Microsoft.Extensions.DependencyInjection;
to your using statements at the top of the file.
Note that in the code sample, the final Assert.Equal
is now testing for the string
that is returned by TestPeopleService
.
Depending on how many customizations you want to make to your Minimal API under test, you can move the WithWebHostBuilder()
and ConfigureServices()
methods out, and override the WebApplicationFactory<T>
class. This has the advantage of having one place where you customize the service collection.
For example, you can create a TestingApplication
class and override the CreateHost
method to customize the service collection:
class TestingApplication : WebApplicationFactory<Person>
{
protected override IHost CreateHost(IHostBuilder builder)
{
builder.ConfigureServices(services =>
{
services.AddScoped<IPeopleService, TestPeopleService>();
});
return base.CreateHost(builder);
}
}
You can use it in tests by replacing new WebApplicationFactory<Program>
with new TestingApplication()
:
[Fact]
public async Task CreatePerson()
{
await using var application = new TestingApplication();
var client = application.CreateClient();
var result = await client.PostAsJsonAsync("/people", new Person
{
FirstName = "Maarten",
LastName = "Balliauw",
Email = "maarten@jetbrains.com"
});
Assert.Equal(HttpStatusCode.OK, result.StatusCode);
Assert.Equal("\"It works!\"", await result.Content.ReadAsStringAsync());
}
If you want to start customizing the Minimal API during tests, make sure to explore the various methods of WebApplicationFactory<T>
that you can override to configure your application for the tests you are writing.
That’s it! You just built several tests for an ASP.NET Core Minimal API, and validated it behaves as expected. You started out with testing a basic endpoint that returned a string, and then saw how to work with different HTTP methods and payloads on the request and response. You even customized the ASP.NET Core service collection with custom services for your tests.
Whether you are writing unit tests, integration tests or both, you should now have a good understanding of how to go about using the test server and customizing the service collection for many scenarios.
If you’re hungry for more, check out the Microsoft docs on integration testing.
]]>